All posts by Heather Mahalik

How was an iPhone setup?

I’ve realized just how important it is to blog vs just do a webcast when I was completing my course updates. I would stumble upon a webcast, but didn’t have time to watch it, so I looked in another direction. This made me realize that I should write down everything I put into a webcast. Will a webcast hold up in course? Do you have time to watch all of them? Seriously, I am curious about the impact so please let me know.

In 2019 – I am going to write down what I talk about in webcasts. If I have the time, I may try to blog about my speaking events as well (think Keynotes and SANS @Nights). Some blogs may be short and sweet, but this way when someone says, “how can I do X” I will point them to my blog. 🙂

To kick this one off, I am going to simply discuss a file that stores information on how an iOS device was setup. This is a file that I am asked about a few times a week. In many cases, it matters if the user synced from iCloud, started from scratch or restored from iTunes. So here goes!

First, you should be obtaining an encrypted backup at a minimum. If you have the ability to get a full file system dump, even better. Without encryption, I cannot guarantee that all of the files I plan to discuss in upcoming blogs will exist. Make sure your analytical tool of choice will decrypt the data. If you are trying to do this for free follow the steps below.

Creating and parsing an encrypted iOS backup for FREE:

  1. Launch iTunes on your forensic workstation. Update if necessary.
  2. Make sure you Trust the computer on the iPhone.
  3. Create an encrypted backup with a password you will remember (yep, people forget all of the time!)
  4. If you aren’t using a commercial tool or one that supports decrypting the backup, you may have to get crafty. I stumbled upon AnyTrans during my updates and it’s pretty sweet. To use this, you must know the password or crack it (refer to other blog posts in my archives.)
  5. Launch AnyTrans and it will show you if you have locked backups.

6. Select the locked backup (you know it’s locked because the option is to “unlock” it.

7. Enter the password and the backup will be unlocked! The top portion shown below is how the backup directory will look. The original backup remains and the unlocked version is called BackupUnlock. If you peek inside that directory, you will find the backup with the date it was unlocked.

8. From here, you can load the unlocked backup into iBackupBot or your tool(s) of choice (iExplorer, etc.). Note: Some commercial tools HATE this format and will not support it. The free ones seem happy enough!

Now let’s get to that file you care about. Once your backup or image is loaded into your tool, you need to locate the following file: /Library/Preferences/com.apple.purplebuddy.plist. I normally just search for purplebuddy.

This plist stores the SetupState of the device which will tell you how the device was setup by the user.

If the user selected to restore a backup from iCloud, the com.apple.purplebuddy.plist will show:

If the user setup the iPhone using iTunes, the com.apple.purplebuddy.plist will show:

It is worth noting that I am testing on an iOS 12.1.x device and I restored from iTunes in 2 ways to obtain these results. First, I wiped and set up via iTunes and then I also forced a restore of a backup via iTunes. I wanted to be sure the SetupState didn’t change. If you find that the user restored from iCloud, consider pulling cloud data if you are legally capable of extracting that form of evidence. Should you find the user restored from iTunes, you now have to find that host computer to do analysis on other potential backups. This is where the fun begins!

Bottom line, Apple has a ton of plists that are relevant. You need to hunt for them. Do a keyword search, dump your device (yep, use the free way I described above) and VALIDATE!!!

If you want to watch the webcast, check it out here: https://www.youtube.com/watch?v=AC2TpWsLPLQ


CAUTION: iBACKUPBOT and iOS10+ potential issues.

Below I am attempted to do the same thing with iBackupBot, but I ran into iOS version issues.

  1. Launch iBackupBot
  2. Make sure you Trust the computer on the iPhone.
  3. Create an encrypted backup. Notice that the tool is telling you that Backup encryption is turned on? This is good.

4. Select where to save the backup image. I recommend into your case directory for the investigation.

5. The backup will be created and then you can open it in iBackupBot for analysis. Once the backup is complete, it will prompt you to open it. If you have issues, this is an iOS10 error from what I have seen. :/ At this point, revert to iTunes.


Determining when an iOS backup was created

One point of contention in the FOR585 Advanced Smartphone Forensic class is – which files store the correct datetime for when a user created an iOS backup?  I’ve engaged in a few friendly arguments over this topic and it recently popped up again when Lee was teaching in NYC in August. Every time this question comes up, I test it again. I have probably tested this more times than I should have, which is why I am finally putting it in writing.

So, when you are asked – “When did a user last create an iTunes or iCloud backup?” – You can answer with confidence next time.

The first thing to consider is what you are examining. Are you looking at a backup file extracted from a PC or Mac? Are you looking at an iCloud backup? Are you looking at a file system dump created by a commercial or free tool? If you are looking at a backup (iTunes or iCloud) this process is a lot easier. If you are looking at a file system dump created by a tool, this is where the confusion may set in. I hope this blog makes your examination easier by breaking down what is happening for each file. For this test, I used my own iPhone that I use every day. Why? Because I know when I backup and I can then verify dates.

The files we are going to examine for backup datetime activity include:

  • info.plist
  • status.plist
  • manifest.plist
  • device_values.plist

All of these files are important, but the dates inside of each may vary and a smartphone tool may update the date inside of the file. If you are looking at a backup that was extracted from a PC or a Mac, the status.plist will contain the start date and time for an iTunes backup.  The info.plist also stores a datetime and whether the backup was successful (snapshot state), but it is not the start date. It is often the completion datetime and doesn’t state if the backup was successful, which is why I rely on the status.plist, when the file is available. The manifest.plist is more helpful when it comes to dealing with locked backup files that need to be cracked. The date in the manifest.plist is often the same as the date in the info.plist and again this file does not track if the backup was successful or not.

Now here is the tricky part. If you completed a file system dump of an iOS device, the following files will most likely show a date that is NOT when the user created a backup. This date will be when you created the forensic image. This makes people uncomfortable, but it makes sense if you think about it. iTunes (or a process like iTunes) is most likely being used in the background to create the forensic image. It makes sense that these datetimes would be trampled. In this case, I rely on device_values.plist which remains untouched by any tool or method you use to create a forensic image of an iOS device.

At this point I have either confused you or validated what you already know. Either way, let’s take a look at my test.

I dumped my iPhone using Cellebrite Physical Analyzer Method 1. I only did Method 1 because I wanted to make sure that it pulled the device_values.plist and I was doing this test during a lab and didn’t have much time. NOTE: I have noticed in the past that this file may only be pulled using Method 2, so use both just in case. If you are wondering why I recommend both of these extraction methods refer to my previous blog posts. I completed this extraction on August 18, 2018 around 14:20 (I had a few connection issues and had to troubleshoot which is why I state “around”). I did not backup my device at this time other than using my tool to create a file system dump (aka – I did not launch iTunes and create a backup).

The info.plist is shown below. Notice the timestamp matches the extraction completion time and NOT the time the device was backed up by the user? If you used a commercial tool to acquire the device, simply look at the Extraction details to compare extraction time.

Next, I looked at status.plist. Again the date is NOT when the user backed up the device. This is when the extraction completed in Physical Analyzer.

Finally, we look at the manifest.plist. And we see the same date, but a time that occurs before the times in info.plist and status.plist.

I believe this is when Cellebrite scans the phone to determine if the tool should present you with the check box to encrypt the backup, or not, if the device is already encrypted. This is also around the time I started the extraction.  So, this is really just showing you how long the Method 1 extraction took and has absolutely nothing to do with when the user last created a backup. Now we look at the device_values.plist and we get the correct answers.

Not only do we get to see datetimes for iTunes backups, but also iCloud, if the user has ever backed up to cloud under com.apple.mobile.backup. We simply have to decode our datetime stamp for the LastiTunesBackupDate and we get June 4, 2018 at 21:32:42 Eastern Time. (Note: I normally keep it at UTC, but I know when I created my last backup in local time and wanted to compare).

So, in short the forensic extraction methods will update the datetime in status.plist, info.plist and manifest.plist during the acquisition process. If you are conducting analysis of an iOS device image (not a backup) you should rely on the datetime recovered from device_values.plist. If you are dealing with a traditional backup file, use the status.plist for the datetime on when the last successful backup was created.


Smartphone Acquisition: Adapt, Adjust and Get Smarter!

June 25, 2018

I have been recently asked by students for a summary on how to handle smartphone acquisition of iOS and Android devices. I have avoided writing it down, like I would avoid the Plague, because mobile changes so quickly and I don’t want people to read something and live by it. I wrote this on my plane ride to Vancouver, so forgive any typos or briefness in this blog.

With that said, these methods are what work for me today. Others may prefer different methods, and that is great. If we were all the same, this would be a boring community, right?

This blog contains what I do on a normal basis when it’s possible. Anyone who conducts mobile device forensics knows that everything changes so quickly and what is possible today may require modification to work tomorrow. We adapt, adjust and are smarter because of it. 🙂

What I decided to do was to focus on Android and iPhone for this blog. Most of you have your favorite vendor tools and that is great. I recommend you use more than one because not one of them is perfect. Don’t become so reliant on one method that you avoid opportunities to test other tools and that you rely so much on a single tool that cannot extract data properly. I am avoiding listing tools specifically that I prefer because I have blogged on that in the past . I am simply defining steps I take that work and you can use the tool of choice to accomplish the following. Remember, it doesn’t have to cost the most to work the best! Sometimes the free methods give you the most data.

Android Acquisition Recommendations

Android devices are becoming increasingly difficult to acquire. We have seen many devices now where basic information (photos, contacts and some calls) are retrieved. Sometimes only data that exists on the SIM is extracted. I am sure many of you have gotten the screen below and it’s disheartening! But we cannot stop trying.

This is not good enough for us to conduct our investigations. We need to get crafty! The first Android running OS 7 that I acquired shocked me. I was getting nothing from the tools! Below is an example of what I pulled – just a bunch of empty directories! Not good…

It was a scary moment for me until I realized that good old ADB was my key to the most data.  I will cut to the chase momentarily, but if you want more information on Android acquisition, I recommend you take vendor training if you rely on a tool and/or take FOR585 Advanced Smartphone Forensics, where we focus on analysis but recently updated the course to include the other options that may work when simple tool acquisition fails.

Things you will need:

  1. Install ADB on your forensic workstation (https://www.xda-developers.com/install-adb-windows-macos-linux/)
  2. Your forensic tools of choice

Android Acquisition Recommended Steps:

  1. ADB Backup (capture both the device (all) and SD (shared))
    • adb backup –all
    • adb backup – shared
  2. Logical Acquisition using a forensic tool – especially if ADB isn’t going well for you
  3. File System Acquisition if more than a backup is offered
  4. Physical Dump if you are aware and don’t care about the traces left behind (i.e. you don’t give the device back and you are not conducting covert operations)
  5. Make sure you acquire the SD card and SIM card if one is present (I like to remove these and acquire separately to ensure nothing is overlooked)
  6. Obtain Google credentials if possible
  7. Extract cloud data – IF YOU HAVE AUTHORITY!
  8. I like to run some ADB commands to the device to ensure I extracted all information and that I am aware of what exists on the Android. Some examples are:
    1. adb shell service list
    2. adb shell pm list packages (shows apps that are installed)
  9. ALWAYS open the extraction to ensure you got what you hoped. If you have a physical dump, Autopsy is the fastest you will gain access to your data! And it’s free. (https://www.sleuthkit.org/autopsy/)

Android acquisition leaves traces behind on the device. If you conduct covert operations – tread carefully here. I put these steps in order with you in mind. Don’t go too far without knowing the footprint your tools and methods are leaving behind. These topics are covered more in the FOR585 class. (http://for585.com/course)

iOS Acquisition Recommendations

For iOS acquisition, it’s the same as it has been for years. Yes, there are rumors of the data port lockout. Yes, there are tools that crack into the device anyway. This blog is not focusing on that. It’s focusing on what you should try when you have an iOS device to investigate. You can choose to work on a Windows or Mac. I do both. Honestly, most of my acquisition takes place on my Windows forensic workstation, but I do have a Mac that I use to examine native files to Apple and for jailbreaking because Windows is sometimes flaky when it comes to that.

Things you will need:

  1. Install iTunes if you plan to create a backup
  2. Install iBackupBot (I prefer this tool over the other free ones because of the option to dump the crash logs) (http://www.icopybot.com/download.htm)
  3. Your forensic tools of choice

Recommended iOS Steps:

  1. Determine the iOS device type (chances are you will not obtain a physical dump because the device is most likely 64 bit and not jailbroken).
  2. Conduct a File System/Advanced Logical Extraction
    1. If using Cellebrite products, make sure you use Physical Analyzer and conduct both Method 1 and Method 2. I do not use UFED to dump iOS devices. Physical Analyzer is better.
    2. If you use Physical Analyzer and see Method 3 – congrats! You have come across a jailbroken device. 🙂
    3. If using another tool, use more than one to ensure you obtain all potential data from the device.
  3. If you want to be thorough, obtain a logical and/or backup file of the device. I typically stop at the file system dump since it contains the backup if I trust my tool (refer to my old blog or take FOR585 for more info on this topic)
  4. Connect the device to iBackup bot and dump the crash logs
  5. Ensure the tools you used did not enable iTunes encryption by connecting the device to iTunes and making sure “Encrypt Backup” is not selected.

6. Obtain iCloud and Google credentials if possible and extract cloud data – IF YOU HAVE AUTHORITY!

Also – do not guess passwords on the device and risk wiping it. Use a method that you have tested or a service that supports that device. If you are desperate and you are locked out, try the following:

For iOS:

  1. Attempt to communicate with (aka run command to) or pair to the device via libimobile

2. Attempt an iTunes backup

3. If you believe you can obtain iCloud credentials, pull the data from there – many tools support this

4. Try multiple cables

5. Only brute force on your own using a “hacker” box if you are willing to wipe the device.

For Android:

  1. Attempt to run ADB commands to the device. Try to collect as much information as possible.
  2. Remove and acquire the SD card in a write-protected manner, if one exists
    1. If not, attempt to acquire the emulated SD via FTK Imager or a similar tool as a USB Mass Storage Device
  3. Remove and acquire the SIM card
  4. Crack the lock if you can access the require files (*.key, etc.)
  5. Pull Google cloud artifacts, if possible – many tools support this
  6. Try multiple cables and modes (Recovery, Safe, Download, etc.) to see if your extraction is failing due to the device not being in the proper state
  7. If the device is unlocked – make sure you properly enabled all required developer mode settings

Again, we cover other methods and direct ways to interact with the device in FOR585 and I don’t want to, nor can I, give all of those juicy details away. This is simply a guide for things you should consider when faced with these devices. Obviously, we don’t all have time to run through all of these steps, but it’s nice to lay out what may work the best for you. If you want to learn more about smartphone forensics, sign up for FOR585 in DC next month. WARNING: The class is sold out so you can log in LIVE via Simulcast! This means you get to take the live course from anywhere and you get 6 days of action from 9-5 with me. You can ask questions via an online moderator and I will answer them LIVE! It’s not pre-recorded it is not OnDemand. It’s a pretty cool setup and I think you will like it. Check it out for585.com/online.

First the Grinch and now the Easter Bunny! Where is Apple Maps hiding?


Why is it that I stumble upon a smartphone artifact that drives me bonkers around holidays??? I am in the midst of the FOR585 course updates and I go through everything in great detail during this time. I expect to see major changes in a full version update (aka iOS 10 to iOS 11 or Android 7 to Android 8) but seeing artifacts hop around (bunny reference there just in case you missed it) in the minor steps of updates (iOS 11.2.5 to iOS 11.2.6) is not something I like. I don’t like it because it makes even more work for me and for you!

As I am writing this, I am updating to iOS 11.3. I hope to have that added into this blog by the end. For now, my research is based on what I noticed when examining 11.2.5 and 11.2.6 in great detail. The Apple Maps is different, inconsistent and just doesn’t make sense. All of the Apple Maps uncertainty started in the minor updates of iOS 10.  I wrote a blog about it titled “How the Grinch Stole Apple Maps.” Read it for all of the details. I am going to summarize what the “Grinch” did.

To do my Grinch blog, I tested the following devices. (Again, a special thanks to my trusting friends and family for granting me access to their devices.)

  • iPhone 6s with a fresh install of 10.0.2
  • iPhone 7 updated from previous iOS versions running 10.0.2
  • iPhone 6s updated from previous iOS versions running 10.0.2
  • iPhone 7 updated from previous iOS versions running 10.2
  • iPhone 6s with a fresh install of 9.3 – jailbroken
  • iPhone 6s+ with a fresh install of 10.1.1
  • iPhone 6 updated from previous iOS versions running 10.1.1
  • iPhone 6s+ updated from previous iOS versions running 10.2
  • iPhone 7 updated from previous iOS versions running 10.1.1

I was attempting to find where Apple Maps was storing my search requests and directions since I couldn’t find them in GeoHistory.mapsdata or the older history.mapsdata.

For each of these devices, I opened Apple Maps and searched for items I could easily identify:

  • Radio City Music Hall, NYC
  • Malvern Buttery

So, when I was just updating my slides, I decided to take a look at my iPhone again (running 11.2.6) and verify the file paths.  I was SHOCKED to see that the GeoHistory.mapsdata was gone.  Literally, not even there. Did the Easter Bunny hide it or did the Grinch steal it completely?

Before, he appeared to be snatching the new data and being evil and allowing you to see the old stuff.  But where the heck are my searches and where did my file go? I honestly even considered that Apple reverted back the history.mapsdata because that file is still present, but that isn’t the case.

What’s a girl to do next? PANIC and then I phoned a few friends and asked them to try to find GeoHistory.mapsdata on their devices (thank you Lee and Mattia for testing with me)  and ultimately went back to my first blog post on it and read it again. Sometimes revisiting your old work can spark something in your mind. One major thing that I took away from reading that blog post again is this:

“*Note: Some of the devices below are syncing with iCloud and some are not. I wanted to be thorough and make sure that the Grinch didn’t take the file to the cloud…”

Could it be that the Easter Bunny did what the Grinch had envisioned and hid the GeoHistory.mapsdata in iCloud? We know the bunny is tricky and this year Easter falls on April fools, so we should expect anything. Here is what I tested and found (so far) during my hunt for this file.

The following test devices were used:

  • iPhone 6s with a fresh install of 11.2.5
  • iPhone 7 updated from previous iOS versions and currently running iOS 11.2.6
  • iPhone X updated from previous iOS versions and currently running 11.2.6 (being updated to 11.3 as I type)
  • iPhone 7 with a fresh install of 11.2.5
  • Many backups from all of my test devices

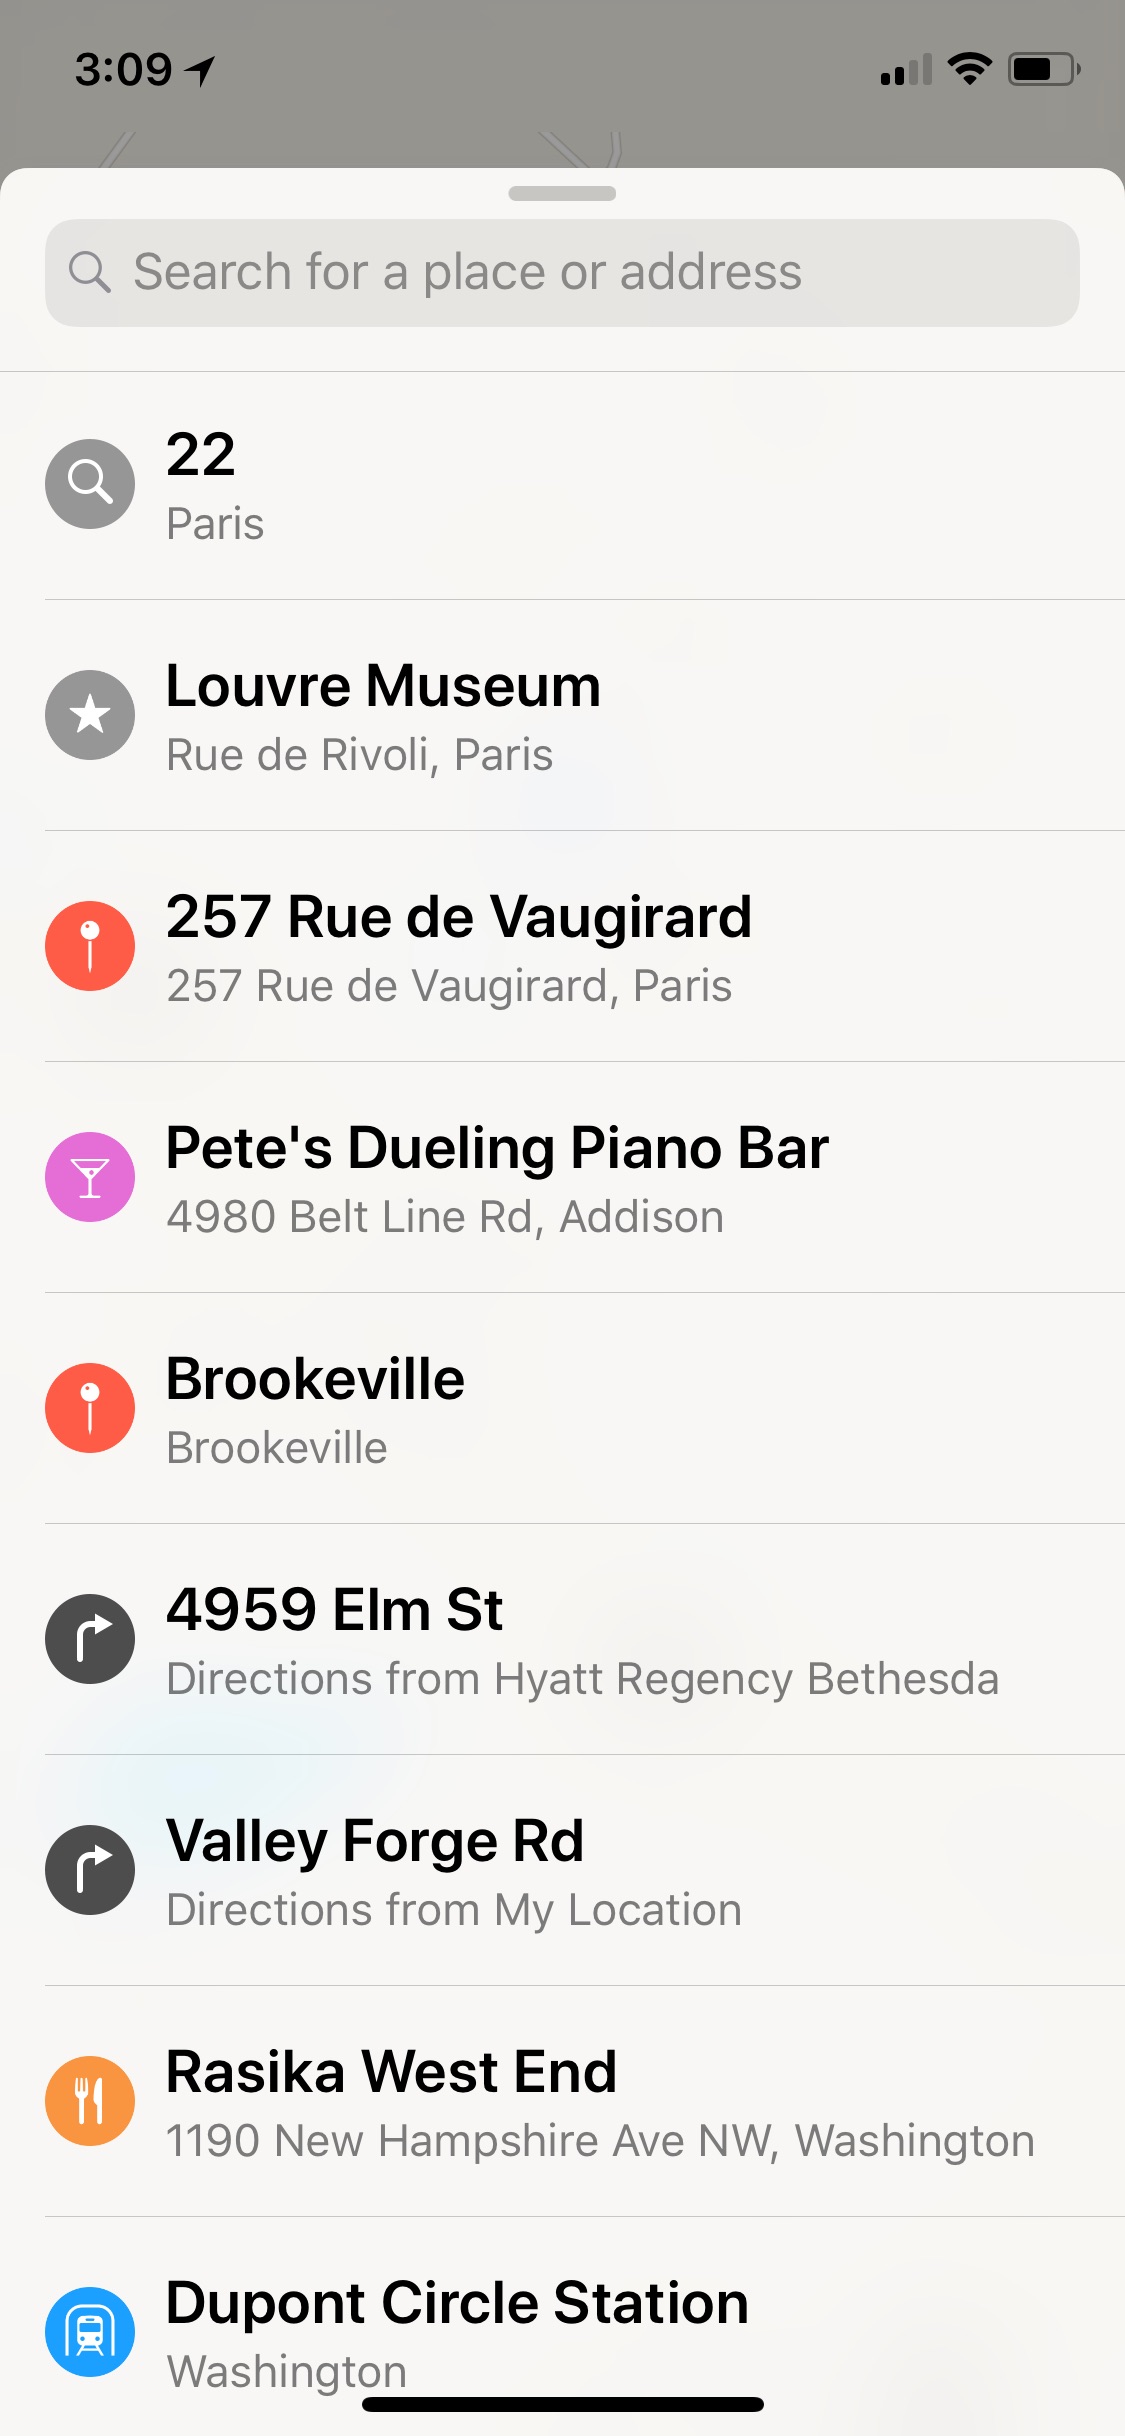
My iPhone is the iPhone X (listed above and I know I searched for locations in Dallas, Panama and in Paris  on recent trips. I rarely use Apple Maps (probably because the Grinch killed it for me) so I rely on it only when Google Maps and Waze let me down.  The iPhone 6s is a test device that I have searched for directions many times in Apple Maps. It makes testing so much easier when you know what data you expect to find. Here is what Apple Maps looks like on my iPhone X.

Once all data was populated, I conducted both iTunes/iCloud backups and Cellebrite Physical Analyzer File System dumps (Methods 1 and 2) to quickly acquire the data. I even tried looking at my attached device live in BlackLight and iBackupBot. I tried parsing the data dumps in BlackLight, Oxygen Detective, Magnet AXIOM, Cellebrite Physical Analyzer and manual examination to ensure I wasn’t overlooking something. I pulled my own iCloud data with Elcomsoft and searched for the file in those backups and still didn’t find exactly what I was looking for – wait for it…

When I manually examined the file system of the backups and data dumps, I started to see major inconsistencies just like I did in iOS 10. The GeoHistory.mapsdata file was sometimes present and sometimes not. The history.mapsdata file was there no matter what. History.mapsdata, contains legacy searches in Apple Maps, it does not contain any data since iOS 8. If you don’t see this file, chances are the user didn’t have a device running iOS 7 that they updated from (aka, they either started fresh with iOS 8 or a newer iOS version).

Based upon my experience with iOS device forensics, it seems that when Apple no longer uses a file, the file persists and is no longer updated. When Apple wants to protect a file, they encrypt it and/or make it inaccessible without a full physical image, which is currently not possible on new devices without a jailbreak.

What I found is that some of the devices running versions ranging from iOS 10.0.2 – 11.2.5 had GeoHistory.mapsdata with older Apple Maps content. None of the devices running iOS 11.2.6 have GeoHistory.mapsdata. This is insanity. Again, I believe if Apple doesn’t want you to see something they encrypt, restrict or hide it.

I promised to keep hunting for you and what better time to hunt than Easter. So, where the heck is this darn file hidden? Well, the Easter Bunny got crafty and hid it in the cloud. Before doing what is listed below, you need to make sure you have legal authority or written consent from the user to access their cloud data. You also need their credentials.

I used Elcomsoft Phone Breaker to first pull iCloud, which I previously mentioned, and didn’t find anything further than what iTunes had presented. Then I pulled the “Synced data” from iCloud. (Thanks Mattia for providing me your results as well!)

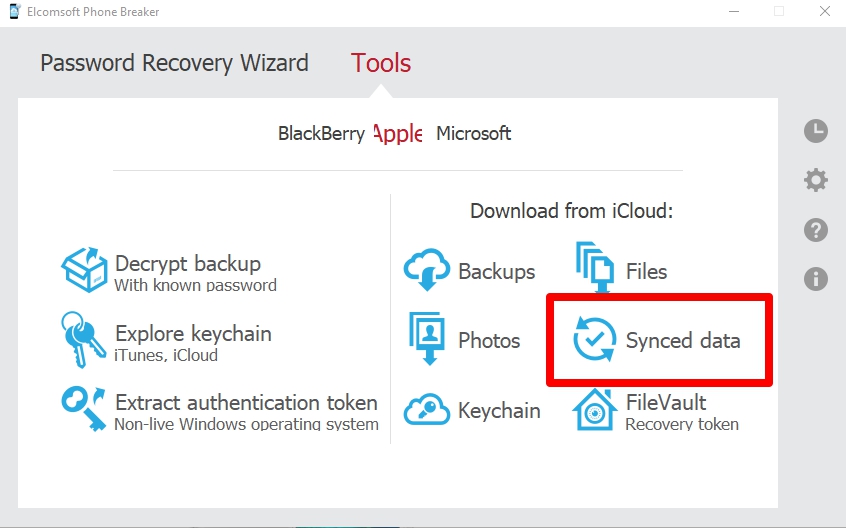
I then entered my iCloud credentials and my PIN for 2FA (yes, this is required the first time you use the tool and will alert the user – user caution here).

From here, I was presented with a list of options to pull from synced iCloud data. Since this is all about Apple Maps, that is all I selected. If you want to learn about the others, I suggest you sign up for FOR585 Advanced Smartphone Forensics (shameless plug- for585.com/course).

What I found when I opened this file blew my mind. I expected this of Apple, so I shouldn’t be shocked, but I couldn’t believe that the crazy Easter Bunny decided to hide my Apple Maps in iCloud. I am just thrilled that I can access some, if not all of the history. Side note: the user must sync to iCloud or you will not find it here. 🙁

To examine the results, Elcomsoft creates an AppleMaps.db file that I examined manually and a file that can be opened in Elcomsoft Phone Viewer. Let’s start with Phone Viewer, because let’s be honest, most people like for a tool to show them the results. (Click on the image to see the graphic in a zoomed in format.)

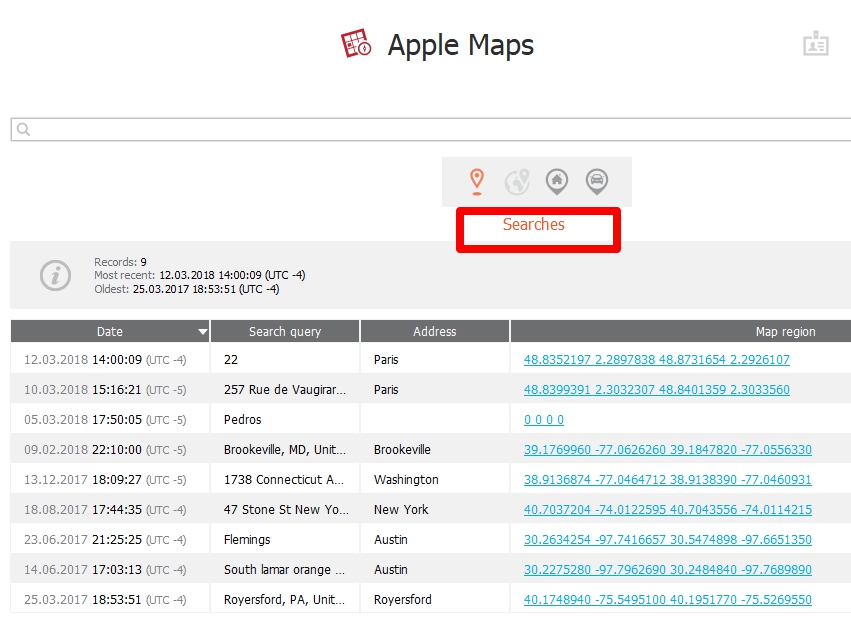
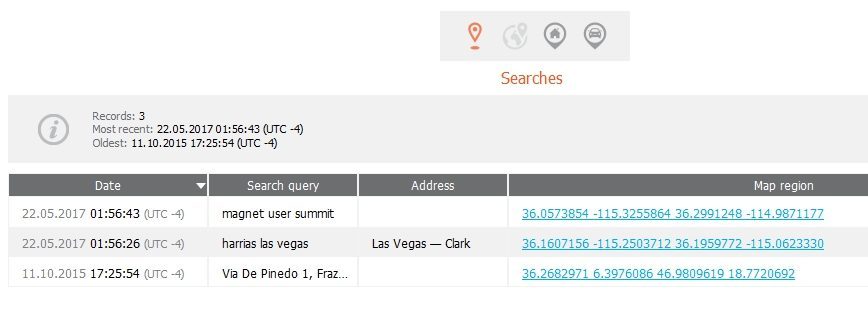
In Elcomsoft Phone Viewer, I started examining searches and saw everything from Paris and Panama that I searched for in addition to other historical searches. This is great news, but let’s keep going because these could just be generic searches where the user didn’t request directions.


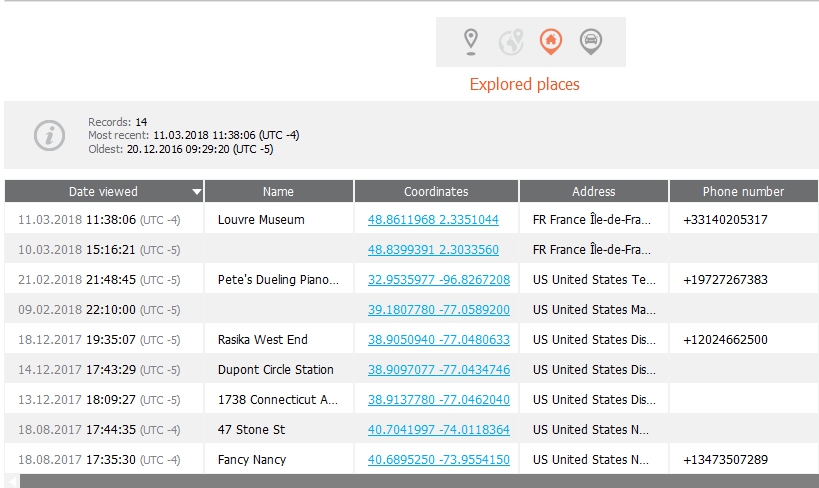
Next I looked at explored places and found other searches that I performed on my iOS device, but not necessarily in Apple Maps. However, when you search for something on an iOS device, the device assumes you may ask for directions and caches that info.

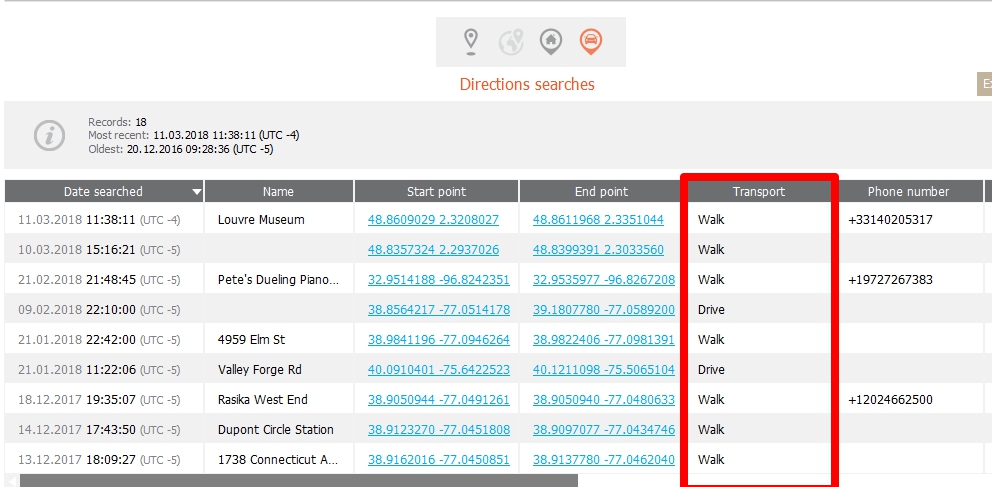
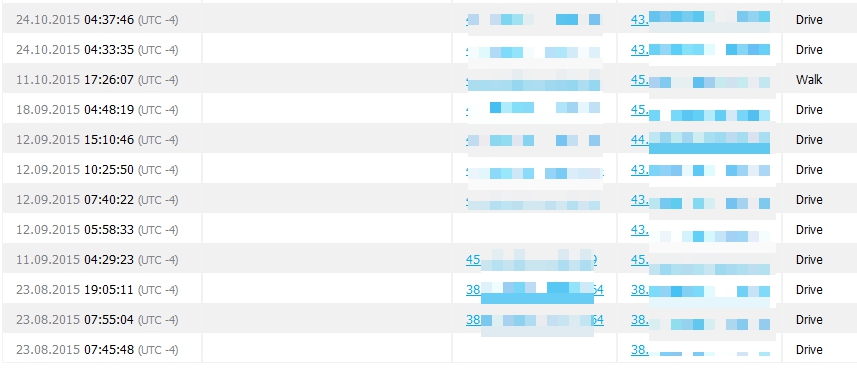
Finally, we find the directions the user searched for. Best part, we get to see how the requested the directions (walk, drive, transit, fly, etc.) Pretty cool stuff.

Thanks to Mattia, I can even show just how far back some of these artifacts span… Again, I am not a huge fan of Apple Maps, so seeing dates from 2015 in Mattia’s data is pretty sweet. Below we can see searches from 2015.

Mattia also had directions from 2015.

The databases can be used as well. This is really helpful if you like to write SQL queries to parse these artifacts. This database is created by Elcomsoft and isn’t something you are going to find on the device. It’s strictly iCloud based. The table provided is called AppleMaps.db. There are several tables provided. You need to determine what is relevant to your investigation, but I recommend during a cursory glance of all of them.

I wrote a simple query to parse the DirectionsSearch table. Please do not copy and paste from this blog. WordPress does some funky formatting the SQLite doesn’t like. Grab it here: AppleMapsQuery.txt

SELECT
datetime(timestamp,’UNIXEPOCH’,’localtime’) AS “Timestamp”,
name,
start_point_name,
start_point_latitude,
start_point_longitude,
end_point_latitude,
end_point_latitude,
telephone,
url,
transport_type AS “0-Drive, 1=transit, 2=walk”,
start_point_is_current_location AS “Start Point:1=Current Location”
from DirectionsSearches
order by timestamp desc

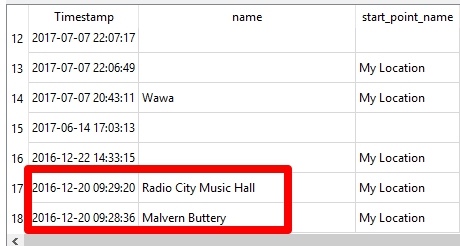
This query found all of the directions I searched for including the pesky Malvern Buttery and Radio City Music Hall, which I was searching for in my Grinch post.

Now I am wondering if the Grinch is in cahoots with the Easter Bunny and it was hidden here all along. :/ This is why we keep testing and digging. This is why we need more than one tool. This is why we have to get out of our own way and start trying to new methods and tools. I also plan to keep testing the cloud capabilities of the other tools to include in my FOR585 update.

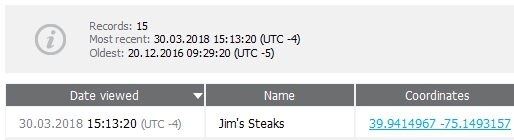
Just as I was done writing, my update to iOS 11.3 completed. I did a simple Apple Maps search for directions to Jim’s in Philadelphia. (Another thanks to Lee for introducing me to Jim’s in 2003! Here, you will get the world’s best cheesesteak.)

I forced my device to backup to iCloud and repeated all of the steps above. Everything appears to be the same and Elcomsoft was able to parse my search from the Synced data. And unfortunately, the GeoHistory.mapsdata is still missing from the file system image.

All of this was done with the demo version of Elcomsoft Phone Viewer. If you want to try a tool, ask the vendor. Most will give you at least a free demo. Not one tool can do it all, so get out there and help me hunt! Oh, and Happy Easter.

Other things you may want:

Files of interest on the device (if the plist appears to be Base64 encoded use Oxygen Detective’s Apple plist Viewer):

Note: For graphics on what these files look like and the paths for each data dump, refer to the Grinch blog.

/var/mobile/Applications/group.com.apple.Maps/Library/Preferences/group.com.apple.Maps.plist

/var/mobile/Applications/com.apple.Maps/Library/Preferences/com.apple.Maps.plist

/var/mobile/Applications/com.apple.Maps/Library/Maps/history.mapsdata

/var/mobile/Applications/com.apple.Maps/Library/Maps/GeoHistory.mapsdad

My Handy Smartphone Toolbox

I realize it’s been awhile and these tools have really changed since my last post in 2015.  Have they changed for the better? Not necessarily. Some tools update so quickly that they lose the basics. For that reason, please test and validate your tools and never trust what is advertised. Your goal should be to determine how the artifacts were placed on the device, not that the artifact exists on the phone. By this I mean – how did it get there? Did the phone suggest it, the user searched for it or was it synced to the device?  This level of analysis is something your tool cannot do for you, which is why you probably read blogs like this and learn what you can trust and where you must apply your smartphone skills.

One of the most common questions I am asked is “which tool is the best?” Guess what? There isn’t just one! And I strongly recommend you use more than one, especially for analysis and sometimes even for acquisition (read my blog on iOS 11 from Oct. 2017).  These tools are picky and seem to like one device better than another and parsing is not the same across the board. You must know the tool strengths and be able to defeat the weaknesses.  To help you out, I am listing the tools that I prefer and my reasons why. These tools are not perfect and they DO NOT have a “Find Evidence” button. Is your tool missing from this list? Offer me a demo and I will try to find time to test it and give feedback. 🙂

As I stated in the last blog I wrote on this topic, I am not going to delve too much into acquisition tools and methods. There are so many out there. Some of the ones I rely on to get my data are Cellebrite UFED (not for iOS devices), Cellebrite Physical Analyzer (for iOS devices), Oxygen, iTunes and my good ‘ole Mac.  I always tell my students to try everything when you have a smartphone on your desk. You don’t know how that device was used and what settings are already enabled behind that locked device. You may surprise yourself when you are able to grab everything with the click of the “acquire evidence” button on your tool of choice. However, it’s not always that easy so verify that you have unencrypted data even if you get a dump.  Additionally, I recommend you always get a physical dump and logical or backup to help you parse the data.  Make sure you test your tools and test them often. Don’t let one hurdle knock you down.

The list below doesn’t include all smartphone tools, but simply the ones I rely upon. If you have others you like, please comment and share. I love hearing what others are using because I don’t have time to test every tool and keep up with the quickly released updates. So, help me out here.

The Heavy Hitting Commercial Solutions (Not in any particular order):

*NOTE: DO NOT RELY ON YOUR TOOL TO TELL YOU HOW DATA WAS PLACED ON THE DEVICE—THAT REQUIRES YOUR KNOWLEDGE! VERIFY ALL LOCATION ARTIFACTS!!!

  • Magnet – IEF Mobile – Great for Internet evidence and parsing 3rd party application data. One of the best iOS app parsers out there. AXIOM is now the up and coming tool, but does have some growing pains, so test it for yourself.  In both of these tools, the Custom/Dynamic App finder is so useful as location additional databases of interest that you should examine for relevance.  This tool easily ingests image files from other tools.
  • Physical Analyzer – Probably the best analytical platform out there specific to smartphone tools. It doesn’t parse everything, but it gives us a platform for analysis where we can leverage it find the evidence with some manual carving and hex searches. PA doesn’t seem to omit files it doesn’t understand, which seems to be happening in other tools.  Best physical search feature for locating data in raw hex, other than in file system dumps of iOS devices. The new fuzzy models plug-ins are fantastic as they identify databases commonly associated to 3rd party applications that aren’t parsed by the tool. This tool easily ingests image files from other tools.
  • MSAB XRY/XACT – One of the only tools that consistently provides access to the raw files (databases, xml, dat, plists, BLOBs, etc.) during a logical acquisition. Guess what, to recover data that the tools don’t parse you need the raw files. This tool give you access to them! XRY is strong at parsing strange backup files from smartphones, such as those created with Samsung Kies.
  • BlackLight – Great tool that can run on a Mac or PC! Primarily supports iOS devices, but I have seen students force load Windows Phones and Android devices into the tool to use it as a file system examination platform. However, it was designed to support iOS devices.  Haven’t you heard that you should examine a Mac with a Mac? A wise examiner once told me that and it still resonates with me. This tool uniquely pulls out Google Maps and Apple Maps searches that the other tools commonly misinterpret. If you hear me talk about BlackLight, you know that I rave about the Windows hard drive support. Strange that the Mac guys are doing so well on Windows. 😉
  • Oxygen – This is one of my new favorites because I am constantly examining 3rd party applications. This tool highlights files the applications use and where they are stored. Guess what? That list is now your cheat sheet. Pretty sweet! I also love the built in PLIST Editor (hex and xml views) and the SQLite editor.  This is the best tool for BlackBerry and BlackBerry 10 devices. It acquires the event log and provides a secure way to create a BB backup file. Also counts out all those nasty little databases for you. I wrote a recent blog on Oxygen, so read it if you want more details on this tool. Just like most of the others, there are growing pains, so test it and validate that it’s showing you all of the data.
  • Elcomsoft – I use the Phone Password breaker to crack locked BlackBerry device, BlackBerry and iOS Backup files. I also use this tool to pull cloud data. It’s awesome! Runs on both a Mac and PC.

The Other Guys (Not free, but not as expensive as the heavy hitters):

Not in any particular order…

  • Andriller – This tool can crack passcodes for locked Android devices and provides logical parsers for iOS, Android and Windows 3rd Party Application files. Free for LE and well worth it for everyone else. The fee is small the results are huge! https://andriller.com/
  • Sanderson Forensics tools – Great SQLite support! The SQLite Forensic Toolkit is so useful in recovering deleted data and for converting those pesky timestamps. I love how this tool shows you how the queries are run and what’s happening when you press a button. New to SQLite forensics – start here!  Stay tuned for Pauls’ new SQLite Forensics book (it’s fantastic and is not a sales pitch for his tool!)  Paul will provide a free demo upon request. http://www.sandersonforensics.com/forum/content.php

Open Source and Other Solutions:

Parsers developed by the community. These people are rock stars and often give back by developing scripts to help us sift through application and smartphone data. Check out their blogs and githubs to get the latest scripts that I rely on to parse the massive amounts of data the commercial tools just don’t support.

  • Mari DeGrazia (http://az4n6.blogspot.com/)
    • SQLite-Deleted-Records_Parser – A must have for unveiling deleted data in SQLite databases.
  • Adrian Leong (http://cheeky4n6monkey.blogspot.com/)
    • His blog rocks! Adrian hits on hard topics. Read it! (HEIC/HEIF on iOS 11 is one of his latest). Also, all of his scripts have been tested to work in the SANS SIFT.
    • Honestly, he has so many scripts out there – go check them out! (Facebook Messenger, SQLite parsers, coordinate converters and more!)
  • Jon Baumann was a student of mine recently who decided to build scripts to fix the things that were broken in the tools. LOVE THAT! https://github.com/threeplanetssoftware/
    • His new sqlite-miner script parses databases containing BLOBs that contain human-readable data. Not only does it identify the contents, it parses them and exports them!
  • Autopsy – The Android Analyzer module hasn’t been updated in a while, but it still supports parsing some items from Android devices. It also gives you access to the File System directory tree faster than any commercial tool out there. Most tools make you wait to see the file system during parsing – not Autopsy. Also, the keyword searching and carvers are top notch. http://sleuthkit.org/autopsy/
  • iBackupBot – Great for parsing iOS backup files. Works on both Macs and PCs. Make sure you have the latest version that supports iOS 10 and 11.

As I always say, I am sure I have forgotten to give credit to some where it’s due, so I am requesting that you help me out. What tools really help you and how? Is there one script that you found and cannot live without? Do you use something more robust than a Java decompiler for mobile malware? Is there something parsing double Base64? Don’t know what that means??? Take FOR585 and Cindy Murphy, Lee Crognale and I will teach you. Our course is offered almost every month and all over the world. Check it out for585.com/course.

Keep digging in that Hex! The data is there and it’s your job to find it.

Time is NOT on our side when it comes to messages in iOS 11

Image result for apple iPhone X meme

This is going to be a series of blog posts due to the limited amount of free time I have to allocate to the proper research and writing of an all-inclusive blog post on iOS 11. More work is needed to make sure nothing drastic is missing or different and to dive deeper into the artifacts that others have reported to me as currently being unsupported by tools.

From what I have seen thus far, I am relieved that iOS 11 artifacts look very similar to iOS 10. This is good news for forensicators who see iOS devices and have adapted to the challenges that iOS 10 brought.  Prior to writing this, I was referred to a blog post on iOS 11, that was an interesting read (thanks Mike). I suggest you also check it out as it pinpoints what is new in iOS 11 in regards to features: https://arstechnica.com/gadgets/2017/09/ios-11-thoroughly-reviewed/5/

Understanding what the OS is capable of doing helps us determine what we need to look for from a forensic standpoint. From what I have seen so far, the major artifact paths have not changed for iOS 11. Key artifacts for normal phone usage appear to be in the same locations:

  • Contacts- /private/var/mobile/Library/AddressBook/AddressBook.sqlitedb
  • Calls-/private/var/mobile/Library/CallHistoryDB/CallHistory.storedata
  • SMS – /private/var/mobile/Library/sms.db
  • Maps – /private/var/mobile/Applications/com.apple.Maps/Library/Maps/History.mapsdata – Still missing? Refer to my blog post from Dec.

When I test an update to a smarphone OS, I normally start with basic user activity (create a new contact, place some calls, send messages, ask for directions, etc.) and then I dump my phone and see what the tools can do.  For this test, I created both encrypted and unencrypted iTunes backups,  used PA Methods 1 and 2 and did a logical extraction with Oxygen Detective. What I found is that not all tools parsed the data in the same manner, which is to be expected. (I also plan to test more methods and tools as time allows and for my FOR585 course updates.)

To get this post done in a timely manner, I found one item that has always been parsed and jumped out as “missing” or not completely supported.

iMessages and SMS  in iOS 11 were the first items that jumped out as “something is off…” and I was right.  I sent test messages and could not locate them in the tools as easily as I have done in the past. I normally sort by date, because I know when I send something.  Up until this release of iOS, we could rely on our tools to parse the sms.db and parse it well. The tools consistently parsed the message, to/from, timestamps, attachments and even deleted messages from this database. Things have changed with iOS11 and it doesn’t seem that our tools have caught up yet, at least not to the same level they were parsing older iOS versions.

One of the most frustrating things I find is that the tools need access to different dumps in order to parse the data (as correctly as it could for this version). For example, Oxygen didn’t provide access to the sms.db for manual parsing, nor did it parse it for examination when the tools was provided and iTunes backup. This had nothing to do with encryption, because the passcode was known and was provided.  UFED isn’t the same as PA Method 1 and 2 (you have heard this from me before), but it’s confusing because most don’t know the difference.  This is what it looked like when I imported the iOS 11 backup into Oxygen.  Believe me, there are more than 3 SMS/iMessages on my iPhone.

However, I when I dumped my iPhone logically using Oxygen Detective, it parsed the SMS and provided access to the sms.db. When I say “parsed” the sms.db, I am not referring to timestamp issues at all, those will be addressed in a bit. Here is what my device looked like when I dumped it and parsed it in Oxygen.

Spot the differences in the messages? Yep, you now see 48,853 more! Crazy… all because the data was extracted a different way.  I also tested adding in the PA, Method 1 image and those message numbers were different, but the sms.db was available and parsed. You really have to dump these devices in different ways to get the data!

Bottom line – add the sms.db to something you need to manually examine for iOS 11 to ensure your tool is grabbing everything and parsing it. The rest of this blog is going to focus on just that – parsing the sms.db in regards to changes found in iOS 11.

Let’s take a look at what is the same (comparing iOS 11 to iOS 10):

  • SMS and iMessages are still stored in the sms.db
  • Multiple tables in this database are required for parsing/joining the messages correctly

What is different (comparing iOS 11 to iOS 10):

  • Additional tables appear to be used?
  • The timestamp is different for iOS 11 – SOMETIMES!

Here is what I found (so far). The tools are hit or miss. Some tools are parsing the data, but storing the messages in a different location, others are parsing the message content, but not the timestamp… you catch my drift…  What I recommend? Go straight to the database and take a look to make sure the tool(s) you rely on are not missing or misinterpreting the messages (wait… didn’t I just say that – YES, I did.)

Thetimestamp fields for the sms.db are all over the place now. What I am seeing is that the length of the Mac Absolute value varies between two formats and both of these formats can be stored in the same column. This is why the tools are struggling to parse these dates.   Additionally, the tables in the sms.db differ in how they are storing the timestamp. So, if your tool is parsing it correctly, excellent – but still take a look at the tables.

Here are some examples of what this mess looks like. The column below is from the chat table in the sms.db. Notice how it has the traditional Mac Absolute value ( number of seconds since 01/01/2001), while others are a 18 digit Mac Absolute values and some are 0 (sent messages).

Additionally, I was seeing some that were 18 digits that were not appended with 00s at the end. The “conv start date” on the left column is from the messages table in sms.db and this timestamp has not changed. As expected, your tools handle this one nicely. The table on the right column is from the chat_message_join table, and this caused a little havoc as well due to the variety of timestamps in the column. Converting this wasn’t fun! Thanks Lee for your help here. You, my friend, ROCK!

When I first ran my SQL query, I noticed this one pesky date that wasn’t converting. This is because it was the timestamp highlighted above and I needed to beef up my query to handle this.  If you see a date that looks like the one below, something is up and you aren’t asking for the data to be rendered correctly. The query below will handle this for you.

Don’t believe me that this causes issues yet, take a look at how it looked in one tool.

The dates and times are not parsed correctly.  I found that the dates and times appear to be consistent when the tools are parsing the 9 digit Mac Absolute timestamps from specific tables. Otherwise, expect to have to do this yourself.  Here is where it was correct, but this wasn’t the case for all of my messages sent using iOS 11.

If you need a sanity check, I always like to use the Epoch Converter that I got for free from BlackBag to make sure I am not losing my mind when dealing with these timestamps. Below, you can see it was parsing it correctly (Cocoa/Webkit Date). Also, I love that it gives you both localtime and UTC.

This leads me to the good news -below is the query that will handle this for you. This query is a beast and “should” parse all sms and iMessages from the sms.db REGARDLESS  of the iOS version, but only columns that I deemed interesting.  (Note that I state should, because this has only been run across a few databases and you should report any issues back to me so they can be fixed.) Take this query and copy and paste it into your tool of choice. Here, I used the DB Browser for SQLite because it’s free. I limited some columns to the ones I care about the most, so you should make sure this query isn’t missing any columns that may be relevant to your investigation.


SELECT
message.rowid,
chat_message_join.chat_id,
message.handle_id,
message.text,
message.service,
message.account,
chat.account_login,
chat.chat_identifier AS “Other Party”,
datetime(message.date/1000000000 + 978307200,’unixepoch’,’localtime’) AS “conv start date”,
case when LENGTH(chat_message_join.message_date)=18 then
datetime(chat_message_join.message_date/1000000000+978307200,’unixepoch’,’localtime’)
when LENGTH(chat_message_join.message_date)=9 then
datetime(chat_message_join.message_date +978307200,’unixepoch’,’localtime’)
else ‘N/A’
END AS “conversation start date”,
datetime(message.date_read + 978307200,’unixepoch’,’localtime’) AS “date read”,
message.is_read AS “1=Incoming, 0=Outgoing”,
case when LENGTH(chat.last_read_message_timestamp)=18 then
datetime(chat.last_read_message_timestamp/1000000000+978307200,’unixepoch’,’localtime’)
when LENGTH(chat.last_read_message_timestamp)=9 then
datetime(chat.last_read_message_timestamp +978307200,’unixepoch’,’localtime’)
else ‘N/A’
END AS “last date read”,
attachment.filename,
attachment.created_date,
attachment.mime_type,
attachment.total_bytes
FROM
message
left join chat_message_join on chat_message_join.message_id=message.ROWID
left join chat on chat.ROWID=chat_message_join.chat_id
left join attachment on attachment.ROWID=chat_message_join.chat_id
order by message.date_read desc

Here is a snippet of what this beauty looks like. (Note: this screenshot was taken prior to me joining attachments – aka MMS).

I always stress that you cannot rely on the tools to be perfect. They are great and they get us to a certain point, but then you have to be ready to roll up your sleeves and dive in.

What’s next – applications, the image/video files that apparently aren’t parsing correctly, interesting databases and plists new to iOS 11 and the pesky maps. That one is still driving me crazy! Stay tuned for more iOS 11 blogs and an upcoming one on Android 7 and 8.

Thanks to Lee, Tony, Mike and Sarah for keeping me sane, sending reference material, testing stuff and helping me sort these timestamps out. Like parenting, sometimes forensicating “takes a village” too.

Image result for keep charging forward meme

Get FOR585 and other DFIR courses at 50% off for Law Enforcement

How, you ask? See below.

If you apply the Local LE discount (50%) to the Advanced Smartphone Forensics (FOR585) or any DFIR course for a 50% discount. There may be limited seats, so act fast.
Only those at the State and Local level who carry a badge can access the program. For everyone else we recommend looking at the “Work Study” program.  Only 1-2 seats per course are generally allowed, but it is a great program that we fought very hard at establishing.
Email locallaw50@sans.org for more information and to check for available seats in a specific course.
Thank you —  if you have any questions please let me know.

for585.com/course

A breath of fresh air! Conducting application analysis with Oxygen Detective

See what I did there? I am getting craftier with these blog titles. First things first – this is NOT a sponsored blog.  I am just really impressed with the bounds Oxygen is making in the mobile world.

A breath of fresh air

I have been using Oxygen for years and this last update has really impressed me. I test tools thoroughly and include the best ones in the SANS FOR585 Advanced Smartphone Forensic course that I co-author. I also use these tools for my regular job, where I aim to find gaps and then fill them with my own methods and tools. So, it’s safe to say that I spend a lot of time becoming familiar with the tools, learning what I am able to trust and where they ultimately fail me.

Normally, I  have a hard time seeing the good side of tool output because the artifacts are often so convoluted and misleading to examiners who don’t know any better. Is it the vendor’s fault – No! The phones are hard to keep up with and the version updates on each OS make it even harder, but examiners like to press the “Find Evidence” button and that makes me shiver. So… that is why I am normally opposed to those who use tools and live by what the tools report without digging in to verify. Don’t get me wrong, there is never enough time, but some things are worth digging for and verifying!

Image result for Stepping off my soapbox meme

What changed my mind about Oxygen? Well, it’s not that I was ever against the tool, I just didn’t see how it added value to my everyday work or smartphone course until this latest release. I have always loved the PList Editor and SQLite Viewer, but that is really where my love existed – until recently, that is. This tool has made my life so much easier! I am going to highlight some of my favorite new features. Why should you care? Because you are going to see smartphones with third-party applications on them. This tool is fantastic at supporting the parsing of third-party apps and when it can’t – guess what? It will give you a cheat sheet for the files you must MANUALLY examine. Now that, is the key to success right there. Don’t believe me, keep reading.

Oxygen has taken the parsing of social networking apps to a new level. This includes popular apps like Facebook, Facebook Messenger, WhatsApp and those less popular ones that will shock you when you load your image file and see the glorious application data parsed for you. Now will this tool get it right every time? No, but it gets you a little bit closer.  Tools should be used to triage what you need to focus your efforts on. Oxygen has been helping me see what I need to hone in on and then allows me to keep my deep dive all within the tool.

My normal application analysis process involves (Note: since this blog is about my Oxygen experience, I am highlighting how to do as much of the examination as possible in that tool):

  1. Scanning the Applications that are parsed by the tool (I commonly use Physical Analyzer, Oxygen, IEF/AXIOM, BlackLight, etc.)
  2. Examining the data for application installation traces
  3. Identifying apps of interest and going directly to the application directory for manual examination and verification (via File Browser in Oxygen Detective)
  4. Combing through each relevant database and examining for both active and deleted artifacts of interest (via SQLite Database Viewer in Oxygen Detective)
  5. Leveraging the SQL Editor to draft my own queries to parse and join tables of interest (No experience here? Try the query builder that is built in to learn)
  6. Examining each .PList of interest (using the Apple PList Viewer in Oxygen Detective)
  7. Examining any other files of interest pertaining to the applications (xml, dat, multimedia, etc)
  8. Examining  browser and webkit artifacts
  9. Exporting what isn’t support and dive into it using another tool

I am a firm believer that one tool cannot solve all of your investigative needs, which is why I use all of the tools available to me to my advantage and branch out from there. For example, I was working an app last week that allowed the user to share their location for a set period of time. The first tools I tried did not parse this data. Even Google maps could not render the broadcasted location from this obscure app. But guess what – Oxygen decoded it and correctly displayed the location I was sharing from that app. How do I know? Because I created test data to mimic what I found in that file on that Android device and it parsed my location information correctly.  Add another thing to the list on what is impressing me about Oxygen.

I aim learn the strengths (and weaknesses) of each tool and tool feature and impart that wisdom on my students. A tool that was great two years ago could be useless today, so you need to keep up and always test and validate with datasets you trust. Not everyone has time to thoroughly test all tools, so we, as a community need to test and share our results (hence most of my blog posts).

Let’s take a  look at some examples. For this scenario, I used Oxygen to highlight application analysis on WhatsApp and webkit artifacts. As previously mentioned, I start by looking at the apps that are parsed vs which are installed. From there, I select the ones of interest and start looking at the actual files. Below, I scanned the files associated to WhatsApp. Some of these were parsed and a lot them were not. This tool gives me a quick reference to the files associated to the application and leaves the rest to me, which I prefer and appreciate. Few tools will provide you the location for all of the files associated with the app. Often, you will find yourself needing to hop around to see the paths for all application data.

During this examination, I opened databases of interest and examined them. Some required queries and the recovery of items marked for deletion, all of which is possible within the tool. If you have other tools you prefer, simply export the file and go on your merry way. What I really like is the ability to get a glance of what is stored within each file without opening each one. Below I was examining a log file associated to WhatsApp without navigating from my list of app files. This is helpful to those of us who are lazy and do not enjoy opening every file and examining the data in separate windows.

After exhasting my examination of the apps themselves, I went to the webkit and browser for more hunting. Below, I am using Oxygen to get an idea of the webkit files available from my data dump. I normally conduct a simple keyword search in my tool of choice for “localstorage”, but this way was much easier and eliminated the need for that step. As a side note, Oxygen did a great job parsing these files. I am simply showing the raw files associated with webkit activity.


Below I am showing an example of a localstorage file that I wanted to customize to fit my examination needs. I drafted a SQL query and joined two tables to show the results I needed for my forensic examination. This can be exported and included in my report template. The SQL Editor was used in this example.

The mapping was great in this tool, but I have decided to omit those screenshots, since it highlights my home location.  I found it interesting at how well the pesky locations (those located in log, xml and dat files) were parsed by Oxygen. If you have heard me present on location artifacts in tools, it is commonly a WARNING to tread carefully. The tools have a hard time interpreting how the location got onto the phone. A simple example: I receive an iMessage with an attached photo. I save the photo to my device. I dump my phone and look at the locations. The location from the shared photo shows up in my report as if my device was there. This is how someone without a lot of experience may interpret that evidence. Hence, be careful! The reality is that the the cool artifacts used and created by third-party apps use are often overlooked. I was thrilled that Oxygen parsed that location information, especially because Google Maps was throwing fits when I was attempting to manually render the lat/longs. Go Oxygen!

In summary, this was just a short blog post highlighting the successes I have been having with Oxygen. Additionally, customer support has been great. Is the tool perfect? No? Is it something you need in your forensic toolbox – Absolutely. If you end up taking FOR585, you will learn more about this tool. For those who aren’t looking for training and just want to test it on their own, see the details below and ask for a demo.

I hope these tools keep growing in capabilities and keep one another competitive to be the best. It helps us as examiners! Even though I use the tools to only get so far and rely on manual investigation techniques, getting over the first few hurdles is the hardest and then you set your pace. (Yes, I ran track… :)) I believe this tool will get you over those hurdles for application analysis.

To try Oxygen Detective and see the benefits for yourself, reach out to sales@oxygen-forensic.com and ask for a demo. Mention my blog!

How the Grinch stole Apple Maps artifacts… or did he just hide them?

Happy Holidays everyone! Tis the time to be relaxing with family or just sitting in your office writing a blog. 🙂 This post is brought to you thanks to a FOR585 Advanced Smartphone Forensic alumni who could not locate an artifact he learned about in class. This artifact is tied to Apple Maps on iOS devices. The file of interest is the GeoHistory.mapsdata, which was introduced with iOS 8 and has been tracking the Apple Maps data since.  This file replaced the legacy history.mapsdata file. This file was required for examination in his case. When he couldn’t find it, he reached out and sent me on a frenzy of testing. Since his question arrived in my inbox, I have been obsessed with figuring out what the “Grinch” did with it.

What I tested (thank you to my brave family and friends for letting me dump your phones for this research):

*Note: Some of the devices below are syncing with iCloud and some are not. I wanted to be thorough and make sure that the Grinch didn’t take the file to the cloud…

  • iPhone 6s with a fresh install of 10.0.2
  • iPhone 7 updated from previous iOS versions running 10.0.2
  • iPhone 6s updated from previous iOS versions running 10.0.2
  • iPhone 7 updated from previous iOS versions running 10.2
  • iPhone 6s with a fresh install of 9.3 – jailbroken
  • iPhone 6s+ with a fresh install of 10.1.1
  • iPhone 6 updated from previous iOS versions running 10.1.1
  • iPhone 6s+ updated from previous iOS versions running 10.2
  • iPhone 7 updated from previous iOS versions running 10.1.1

For each of these devices, I opened Apple Maps and searched for items I could easily identify:

  • Radio City Music Hall, NYC
  • Malvern Buttery

Additionally, I sent my mother in law to the grocery store and had her literally use Apple Maps on her iPhone 6 running 10.1.1 to ensure the data would “stick.”

Once all data was populated, I conducted both iTunes backups, Cellebrite Physical Analyzer File System dumps (Methods 1 and 2 for non-jailbroken devices, Method 3 for jailbroken devices, and Method 1 for devices running 10.2) and BlackLight for acquisition of the data. I tried parsing the data dumps in BlackLight, Oxygen Detective, Magnet IEF, Cellebrite Physical Analyzer and manual examination to ensure I wasn’t overlooking something. I pulled my own cloud data with Elcomsoft and searched for the file in those backups with some luck – wait for that at the end.

When I manually examined the file system of the backups, I started to see major inconsistencies. The GeoHistory.mapsdata file was sometimes present and sometimes not. The history.mapsdata file was there no matter what.  Based upon my experience with iOS device forensics, it seems that when Apple no longer uses a file, the file persists and is no longer updated. When Apple wants to protect a file, they encrypt it and/or make it inaccessible without a full physical image, which is currently not possible on new devices without a jailbreak.

Below is a list of the phones from above showing which devices presented access to the GeoHistory.mapsdata file. (Note: Additional testing was done by Sarah Edwards and Lee Crognale on their devices to confirm my findings – thanks a ton ladies.)

  • iPhone 6s with a fresh install of 10.0.2 – GeoHistory.mapsdata was present and contained Apple Maps data
  • iPhone 7 updated from previous iOS versions running 10.0.2 – NO GeoHistory.mapsdata
  • iPhone 6s updated from previous iOS versions running 10.0.2 – GeoHistory.mapsdata was present and contained Apple Maps data
  • iPhone 7 updated from previous iOS versions running 10.2 – NO GeoHistory.mapsdata 
  • iPhone 6s with a fresh install of 9.3 – jailbroken – GeoHistory.mapsdata was present and contained Apple Maps data
  • iPhone 6s+ with a fresh install of 10.1.1 – NO GeoHistory.mapsdata
  • iPhone 6 updated from previous iOS versions running 10.1.1 – NO GeoHistory.mapsdata
  • iPhone 6s+ updated from previous iOS versions running 10.2 – NO GeoHistory.mapsdata
  • iPhone 7 updated from previous iOS versions running 10.1.1 – NO GeoHistory.mapsdata

Here are some examples of what I was expecting to see:

Example 1: An iPhone that has been updated to iOS 10+.  We know it has been updated because we see the historical History.mapsdata file as well as the GeoHistory.mapsdata.

Example 2: Examining the Hex of the GeoHistory.mapsdata. Below we can see my search for Malvern Buttery.

Example 3: What the data may look like – NOT GOOD! While the file, History.mapsdata, contains legacy searches in Apple Maps, it does not contain any data since iOS 8.

Continuous searching for locations that I populated in Apple Maps lead to two files that seemed to store the most recent search conducted and manual location entry in Apple Maps, but lacked additional artifacts.  The first is /mobile/Applications/group.com.apple.Maps/Library/Preferences/group.com.apple.Maps.plist.  In the example below, I used Apple Maps to search for a location in Sedona, AZ. Keep in mind that this was the most recent Apple Maps search on the device at that point in time ( I was running iOS 10.1.1). Nothing I searched for after that was found in this file.

The second location was mobile/Applications/com.apple.Maps/Library/Preferences/com.apple.Maps.plist. This was the only location where I could find my search for Radio City Music Hall. There was nothing of interest other than the fact that the location was listed with a bunch of yelp reviews.

My current location was not captured, which normally occurs in the .mapsdata files. I think this plist is tracking the last search within Apple Maps where the goup.com.apple.Maps.plist seemed to save the last manual entry in Apple Maps. Again, this is an assumption which requires further testing and research.

From the device side, it seems that the Grinch has stolen the GeoHistory.mapsdata from the following devices/versions:

  • The iPhone 7 running any version starting with 10.0.2 – EVEN devices that have been updated from previous iOS versions.
  • Any iPhone running iOS 10.1.1
  • WARNING: iOS 10.2 presents us with major hurdles and potentially missing artifacts that span beyond the GeoHistory.mapsdata.  Get ready to learn ways around this… check out how it looks in Physical Analyzer below.

From the iCloud perspective. I used Elcomsoft Phone Breaker to extract my iCloud data. I had three snapshots in the cloud from two different iOS versions. (Keep in mind you need legal authority, consent or some form of permission to access cloud data.) What I found is even more confusing.

  • iPhone 7 backup from iOS 10.2 – GeoHistory.mapsdata was present but not updated with current Apple Maps data
  • iPhone 7 backup from iOS 10.1.1 – No GeoHistory.mapsdata

Not sure why the file is not present with 10.1.1 or where the Grinch put it, but I promise to keep searching.  I plan to focus research on iOS 10.2, cloud data and additional location artifacts for the FOR585 course update and will blog on findings. I may even do a SANS webcast after the baby and I get settled in (yes, I am due to have a baby in 24 days.)

In the meantime, please test on your own devices and let me know if you find where the Grinch placed this file, if that is even possible. Also, make sure you always validate your findings and your tools. I know I taught my student the right way because he was manually digging to find the truth. That’s what mobile forensics is all about even when the results are not what we expect and the artifacts we need are stolen by the mean Grinch!

I’m really hoping that 2017 brings us a new artifact that is storing this data or we find a way to access this missing file. Happy Holidays!

Update: Solutions for iOS10 – Encrypted Backup Files, Cracking Passwords and Data Acquisition

Happy Friday everyone. After my post last week, I was in touch with several vendors about what was occurring, my thoughts and how they intended to fix the problem when it comes to accessing the backup file data. Since then, two vendors (Cellebrite and Elcomsoft) reached out with an updated solution. I tested these tools over the last two days and want to share my results. I used Cellebrite Physical Analyzer v 5.3.5.10 (soon to be released), Elcomsoft v6.10 and iTunes 12.5.1 as well as the previous iTunes version to be thorough.

What changed since the last blog?

First, if an iOS10 backup file was encrypted with iTunes, you do not need to assume you cannot get into that data. (This was the case in my previous blog. Even if the password was known, the tools were choking on the data).  If you can crack the password, Cellebrite’s UFED Physical Analyzer will properly decrypt this data. I bet you are now wondering how I cracked the encrypted iOS 10 backup files? I used  Elcomsoft Phone Breaker v 6.10.

Cracking an encrypted iOS10 backup file

I set three different passwords to test. The first was 0000 and Elcomsoft laughed at this and provided the password before I could even sit back in my chair to watch. I then updated iTunes and changed my password to “hank” – this password didn’t even take a full second to crack.

elcomsoft_cracked

Maybe their claims are true that they will crack a passcode the fastest due to a vulnerability they found in the hashing of the passcode.

Researchers say iOS 10 backups can be cracked 2,500 times faster


I then set a more difficult password “Heather1” and backed up my data using iTunes. Elcomsoft is saying that there is 87 years remaining for a brute force attack, so I am not going to wait. What should you do here? Try a dictionary attack! It’s much more effective with passwords such as “Heather1” when compared to Brute Force. When I changed to dictionary attack, this password was crack in less than 1 second! As a side note, I relied on the English dictionary and did not create anything custom for this test.

encrypted-complex

So, we have the password, what about the encrypted databases?

I was able to successfully parse all of the iOS10 backup files that I created over the last two days, containing various backup passwords, as well as the ones that were created for my previous blog post. As long as Physical Analyzer had the password, the data was decrypted and parsed. Make sure you are using Physical Analyzer v5.3.5.10 or later (assuming you have tested and validated the latest versions).

When attempting an Advanced Logical in Physical Analyzer, the option to encrypt the backup is provided if the backup has not been encrypted via iTunes by the user. You should select this option. If not, you will not get the data protected by the keychain. I selected to Encrypt my backup as shown below.

pa-encrypt

As stated in my last post, this was not an option with iOS10. Cellebrite has fixed this issue and all of the data will be parsed and decrypted. Additionally, if you are prompted for the users iTunes backup file password (the one you cracked with Elcomsoft), Physical Analyzer will parse the data when the password is correctly entered whether you selected an Advanced Logical Extraction or to add an iTunes backup file into the tool for analysis.

pa-parsingbackup_encry

To be thorough, I tested the following in physical analyzer:

1. Added an encrypted backup with iTunes (older version) into Physical Analyzer with the Open Advanced option
2. Added an encrypted backup with iTunes (latest version)  into Physical Analyzer with the Open Advanced option
3. I removed the iTunes password from the iPhone and selected to Encrypt Backup during Advanced Logical Extraction
4. I reset the passcode in iTunes and then selected Advanced Logical Extraction. I was prompted for the user’s backup password.
pa-parsed_extraction-summary
The results – Physical Analyzer parsed the databases that I stated were encrypted in my previous test.! This is great news for those of us who use this tool to conduct smartphone forensics. And yes, I realize that I am out of space on my iPhone… I am waiting on my 128GB iPhone 7 to arrive. 🙂
Not only did it parse the databases, they are decrypted. These databases can be exported and put into other tools for parsing, merging and interpreting the data – something like Paul Sanderson’s SQLite Forensic Browser.  Below is a sample of my call history database.
call_history-not-encrypted
Now how to handle your analysis of iOS 10… not as easy
When we take the tools out of the equation, which is required to determine how the data got onto the phone, this process gets much harder. Below, you can see what Physical Analyzer is reporting for my location information. If you have heard my and Sarah Edwards endless presentation on location information, you are already aware that these iOS devices track a lot that we do and also track other things people do for us! What does that mean? If a friend tags you in a social media post, this data can show up on your device as a location you have visited – even if you haven’t been there. Why? Because you or something gave that app or browser permission to do this. What does this look like?
pa-parsed_extraction
In this example, I can tell you what is true and what is not. How – it’s my phone! If it weren’t, I better be prepared to manually look at databases and artifacts to piece this information back together. For example, that Facebook location is the lat/long for one of my friends on chat. I was not at that location. Mail Content, iPhone RecentLog, Map Searches, Map Suggestions and more all need to be verified by an examiner. The tool cannot do this for you. The tool also cannot pull location information from 3rd party applications that they do not parse.
Need to learn proper examination techniques – take FOR585 Advanced Smartphone Forensics. We teach you how to stand behind the evidence you put in your report.
Your tool can only get you so far. My concern in my first blog was that our tool couldn’t even get us beyond the first hurdle. Now that they have, are you prepared to defend your report or what the tool is telling you? Remember, these tools parse everything that is on the phone. It’s your job to determine how the data got there.
See you in class soon! FOR585.com/course