Tag Archives: android

Android and iOS acquisition Recommendations

I have been meaning to update this blog for years, so here goes. This blog is going to cover what I recommend to get the most data from iOS and Android devices. Many tools exist to successfully extract data from mobile devices and I am sharing some of my favorite methods that have proven to be successful for me over the years.

ANDROID Acquistion

Since most devices are using File Based Encryption (FBE), physical acquisition may not be possible. For devices that can be physically acquired, that should render the most data. The next best option to collect the most data from the phone is Full File System access. HOT devices should be acquired quickly. To explain HOT – If the device is in an AFU (after first unlock) state, make sure you acquire it and ensure the device doesn’t reboot, if possible. A reboot will put the device into a BFU (before first unlock) state and may be difficult or impossible to acquire without the passcode.

Things you will need:

  1. Install ADB on your forensic workstation https://www.xda-developers.com/install-adb-windows-macos-linux/
  2. Your forensic tools of choice.
  3. Mattia Epifani’s Android Triage script https://blog.digital-forensics.it/2021/03/triaging-modern-android-devices-aka.html

Android Acquisition Recommended Steps:

  1. Obtain a Physical or Full File System extraction with Cellebrite UFED, Premium or Premium ES. These are my preferred tools, others can be used as well.
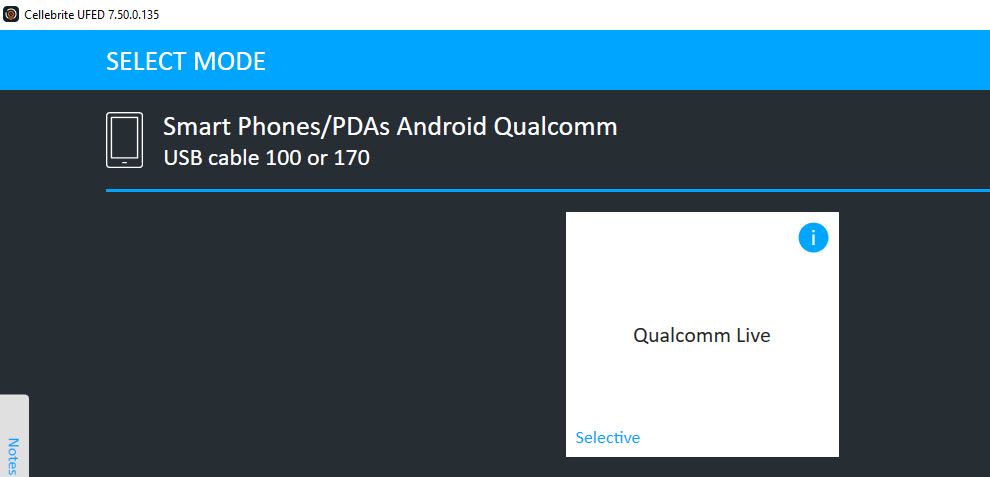
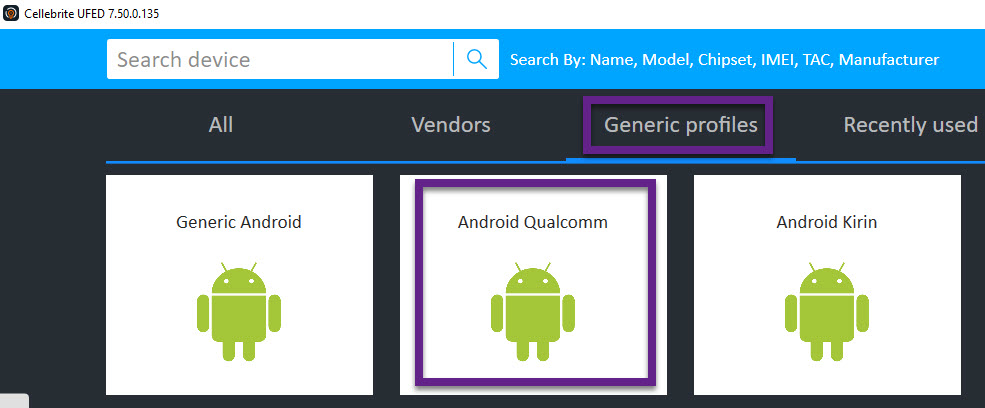
    • If a Full File System is not possible for a specific model, verify the chipset and try Android Qualcomm/Qualcomm Live under Generic profiles.
    • Make sure you open the extraction prior to returning the device to ensure the data is not encrypted!
UFED Generic Profiles
Qualcomm Live Android Option
  1. File System Acquisition
    • This may simply be a backup and backups don’t get a lot with newer Android devices.
    • Try Generic Android on Cellebrite UFED if you are not finding the specific model to be working.
  2. Logical Acquisition using a forensic tool – especially if ADB isn’t going well for you. I recommend using more than one tool or a single tool and also capturing an ADB backup for validation purposes.
    • Note that most tools will install a software agent in order to extract data from the device. This is normal and accepted. If you are ever questioned on what the software agent is doing, simply extract the APK and examine it manually to review the permissions.
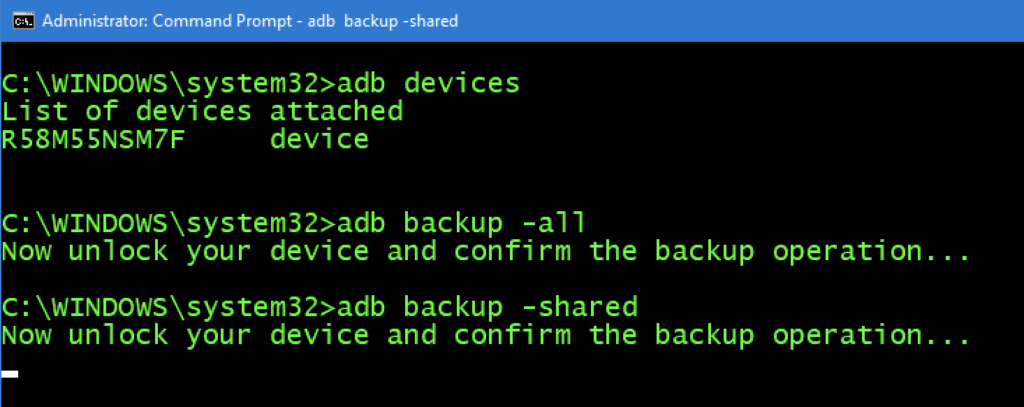
  3. FREE WAY – ADB Backup (capture both the device (all) and SD/media (shared))
    • adb backup –all
    • adb backup – shared
  1. Make sure you acquire the SD card and SIM card if one is present.
    • I like to remove these and acquire separately to ensure nothing is overlooked.
    • Make sure you write-protect the SD card.
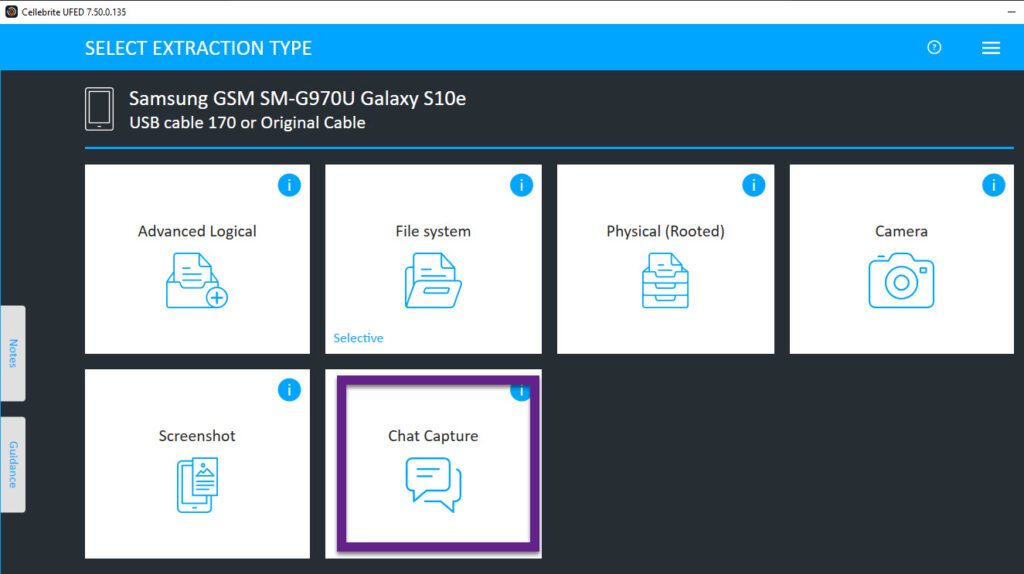
  2. Use Cellebrite UFED to conduct a Chat Capture. I love the generic option as any screen can be captured and parsed for analysis.
    • I like to use chat capture to grab the settings screen of the device and to access application data that may not be extracted with the methods above. This method is great for apps that are not parsed or extracted.
  1. Extract cloud data – IF YOU HAVE AUTHORITY! My tools of choice for this are Physical Analyzer and Elcomsoft. Magnet and Oxygen work well too.
  2. I like to run some ADB commands to the device to ensure I extracted all information and that I am aware of what exists on the Android. The script from Mattia that is mentioned above can capture all of these commands for you with a nice GUI.
  3. ALWAYS open the extraction to ensure you got what you hoped. If you have a physical dump, Autopsy is the fastest you will gain access to your data! And it’s free. (https://www.sleuthkit.org/autopsy/). You can also use FTK Imager or a similar tool that is free for quick access.

Android acquisition leaves traces behind on the device. If you conduct covert operations – tread carefully here. Don’t go too far without knowing the footprint your tools and methods are leaving behind. These topics are covered more in the FOR585 class http://for585.com/course, in blogs and webinars found at https://www.cellebrite.com/en/resources/. Also note that multiple extractions may be necessary to capture the most information from these devices.

iOS Acquisition Recommendations

For iOS acquisition my methods have remained steady and I am not as paranoid as I am with Android. You can choose to work on a Windows or Mac. I do both. Honestly, most of my acquisitions take place on my Windows forensic workstation, but I do have a Mac that I use for jailbreaking.

Things you will need:

  1. Install iTunes if you plan to create a backup on Windows. Finder will work on the Mac.
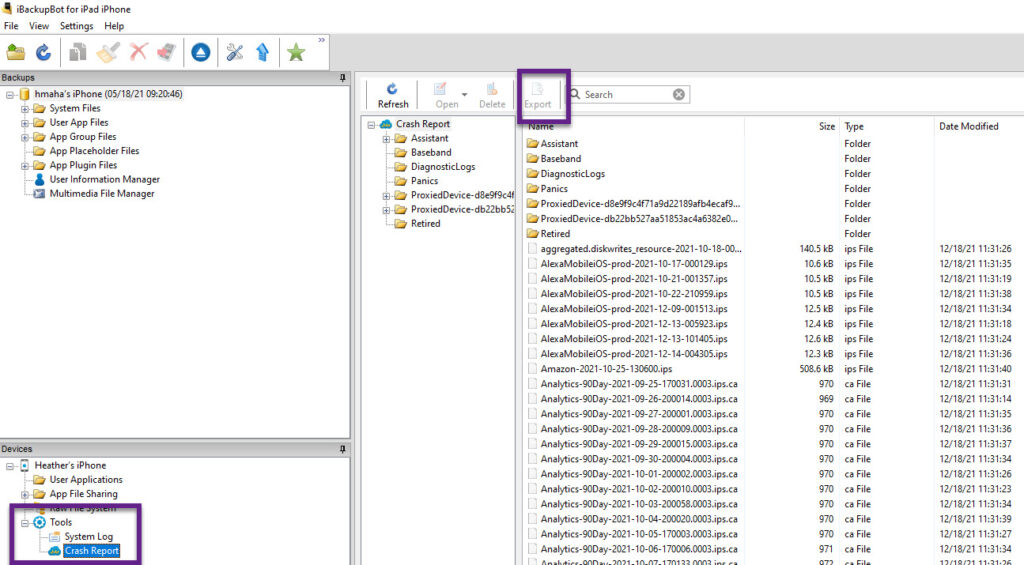
  2. Install iBackupBot (I prefer this tool over the other free ones because of the option to dump the crash logs http://www.icopybot.com/download.htm
  3. Your forensic tools of choice.
  4. ArtEx – if you are examining a jailbroken device. Read Ian Whiffin’s blogs! http://www.doubleblak.com

Recommended iOS Steps:

  1. Determine the iOS device type and type of iOS device.
  2. Obtain a Full File System Extraction.
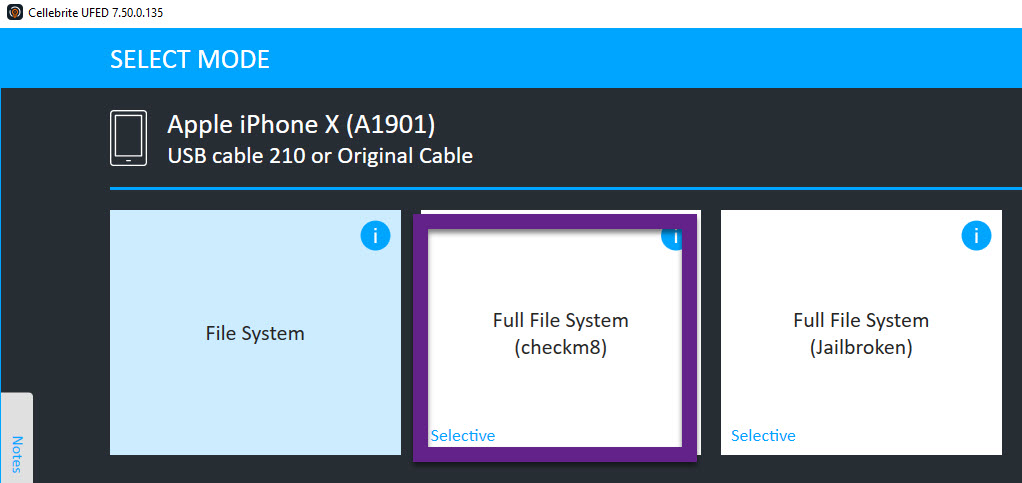
    • I prefer using Cellebrite UFED checkm8.
  1. If the device is already jailbroken, I will use Cellebrite UFED Full File System. Other tools will work as well.
    • If I get a Full File System extraction I stop at this point other than obtaining log files, which is mentioned in steps 6 and 7.
  2. Conduct a File System/Advanced Logical Extraction – YOU MUST ENCRYPT the extraction!
    • This can be done in most tools. I use Cellebrite UFED and make sure to encrypt the backup. Cellebrite will use 1234 to do this.
    • If using another tool make sure the option to encrypt the extraction is there or you will MISS a lot of data starting with iOS 13. Refer to my other blogs for more information on this.
  3. If you want to be thorough, obtain a logical and/or backup file of the device. I typically stop at the Full File System or file system dump since it contains the backup if I trust my tool (refer to my old blog for more info on this topic).
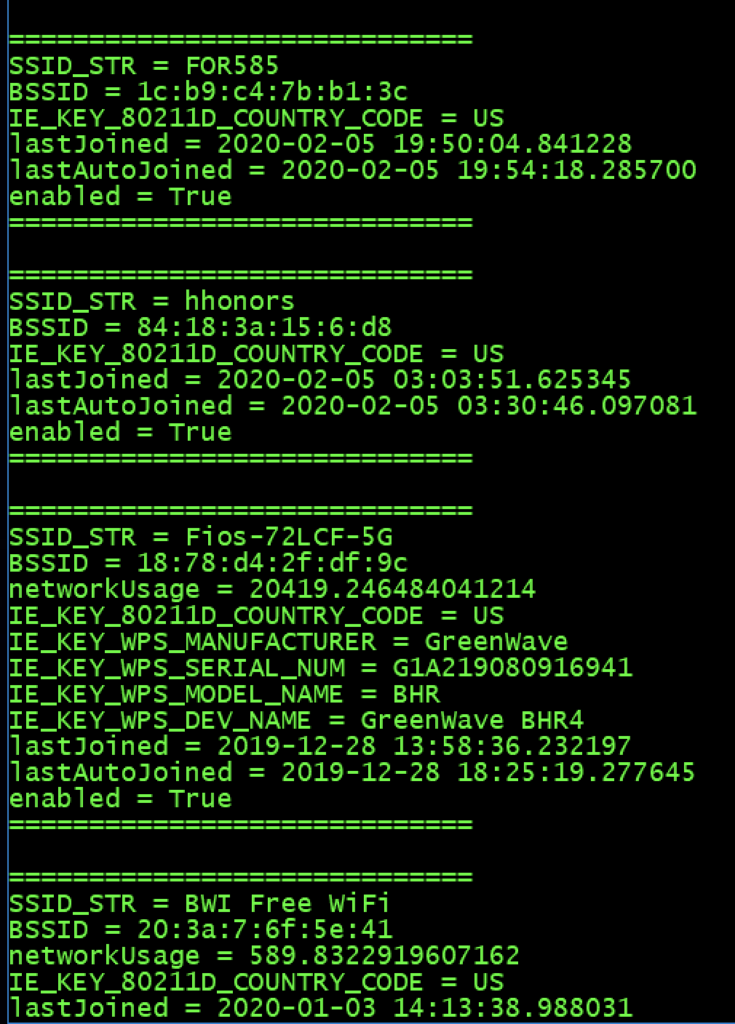
  4. Connect the device to iBackup bot and export the crash logs.
  1. Collect sysdiagnose logs and extract them. This can be done nicely with Elcomsoft. More information is at www.for585.com/sysdiagnose
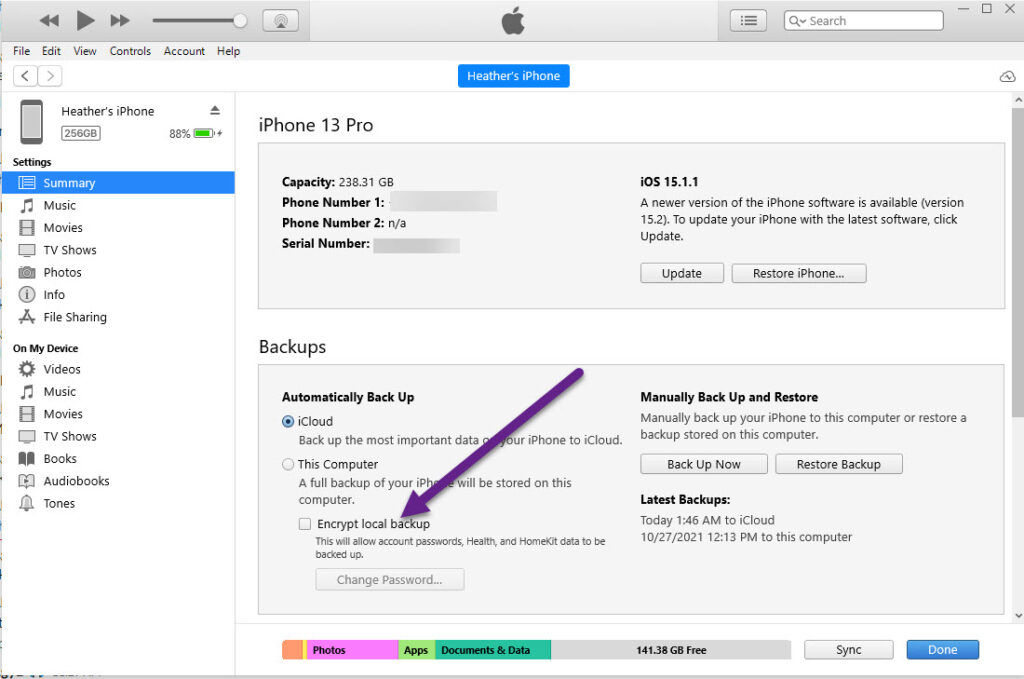
  1. Ensure the tools you used did not enable iTunes encryption by connecting the device to iTunes and making sure “Encrypt Backup” is not selected. This should be performed prior to giving the device back to the suspect/custodian/witness.
  1. Extract cloud data – IF YOU HAVE AUTHORITY! I prefer the same tools mentioned above in the Android part of this blog.

Everyone has their preferences on tools and acquisition methods. A Full File System is the best bang for your buck on most devices. Make sure you validate your extracted data and reach out to the vendors you leverage if issues arise.

A breath of fresh air! Conducting application analysis with Oxygen Detective

See what I did there? I am getting craftier with these blog titles. First things first – this is NOT a sponsored blog.  I am just really impressed with the bounds Oxygen is making in the mobile world.

A breath of fresh air

I have been using Oxygen for years and this last update has really impressed me. I test tools thoroughly and include the best ones in the SANS FOR585 Advanced Smartphone Forensic course that I co-author. I also use these tools for my regular job, where I aim to find gaps and then fill them with my own methods and tools. So, it’s safe to say that I spend a lot of time becoming familiar with the tools, learning what I am able to trust and where they ultimately fail me.

Normally, I  have a hard time seeing the good side of tool output because the artifacts are often so convoluted and misleading to examiners who don’t know any better. Is it the vendor’s fault – No! The phones are hard to keep up with and the version updates on each OS make it even harder, but examiners like to press the “Find Evidence” button and that makes me shiver. So… that is why I am normally opposed to those who use tools and live by what the tools report without digging in to verify. Don’t get me wrong, there is never enough time, but some things are worth digging for and verifying!

Image result for Stepping off my soapbox meme

What changed my mind about Oxygen? Well, it’s not that I was ever against the tool, I just didn’t see how it added value to my everyday work or smartphone course until this latest release. I have always loved the PList Editor and SQLite Viewer, but that is really where my love existed – until recently, that is. This tool has made my life so much easier! I am going to highlight some of my favorite new features. Why should you care? Because you are going to see smartphones with third-party applications on them. This tool is fantastic at supporting the parsing of third-party apps and when it can’t – guess what? It will give you a cheat sheet for the files you must MANUALLY examine. Now that, is the key to success right there. Don’t believe me, keep reading.

Oxygen has taken the parsing of social networking apps to a new level. This includes popular apps like Facebook, Facebook Messenger, WhatsApp and those less popular ones that will shock you when you load your image file and see the glorious application data parsed for you. Now will this tool get it right every time? No, but it gets you a little bit closer.  Tools should be used to triage what you need to focus your efforts on. Oxygen has been helping me see what I need to hone in on and then allows me to keep my deep dive all within the tool.

My normal application analysis process involves (Note: since this blog is about my Oxygen experience, I am highlighting how to do as much of the examination as possible in that tool):

  1. Scanning the Applications that are parsed by the tool (I commonly use Physical Analyzer, Oxygen, IEF/AXIOM, BlackLight, etc.)
  2. Examining the data for application installation traces
  3. Identifying apps of interest and going directly to the application directory for manual examination and verification (via File Browser in Oxygen Detective)
  4. Combing through each relevant database and examining for both active and deleted artifacts of interest (via SQLite Database Viewer in Oxygen Detective)
  5. Leveraging the SQL Editor to draft my own queries to parse and join tables of interest (No experience here? Try the query builder that is built in to learn)
  6. Examining each .PList of interest (using the Apple PList Viewer in Oxygen Detective)
  7. Examining any other files of interest pertaining to the applications (xml, dat, multimedia, etc)
  8. Examining  browser and webkit artifacts
  9. Exporting what isn’t support and dive into it using another tool

I am a firm believer that one tool cannot solve all of your investigative needs, which is why I use all of the tools available to me to my advantage and branch out from there. For example, I was working an app last week that allowed the user to share their location for a set period of time. The first tools I tried did not parse this data. Even Google maps could not render the broadcasted location from this obscure app. But guess what – Oxygen decoded it and correctly displayed the location I was sharing from that app. How do I know? Because I created test data to mimic what I found in that file on that Android device and it parsed my location information correctly.  Add another thing to the list on what is impressing me about Oxygen.

I aim learn the strengths (and weaknesses) of each tool and tool feature and impart that wisdom on my students. A tool that was great two years ago could be useless today, so you need to keep up and always test and validate with datasets you trust. Not everyone has time to thoroughly test all tools, so we, as a community need to test and share our results (hence most of my blog posts).

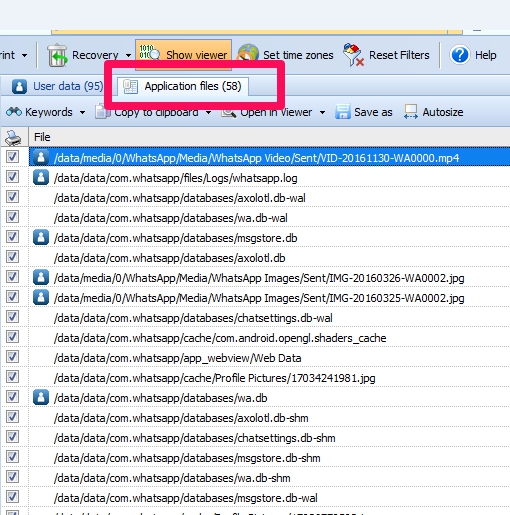
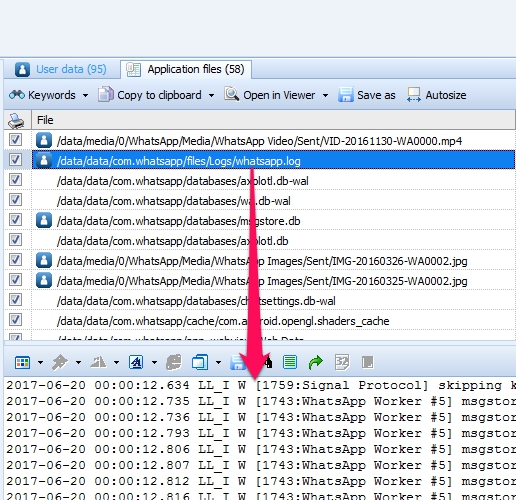
Let’s take a  look at some examples. For this scenario, I used Oxygen to highlight application analysis on WhatsApp and webkit artifacts. As previously mentioned, I start by looking at the apps that are parsed vs which are installed. From there, I select the ones of interest and start looking at the actual files. Below, I scanned the files associated to WhatsApp. Some of these were parsed and a lot them were not. This tool gives me a quick reference to the files associated to the application and leaves the rest to me, which I prefer and appreciate. Few tools will provide you the location for all of the files associated with the app. Often, you will find yourself needing to hop around to see the paths for all application data.

During this examination, I opened databases of interest and examined them. Some required queries and the recovery of items marked for deletion, all of which is possible within the tool. If you have other tools you prefer, simply export the file and go on your merry way. What I really like is the ability to get a glance of what is stored within each file without opening each one. Below I was examining a log file associated to WhatsApp without navigating from my list of app files. This is helpful to those of us who are lazy and do not enjoy opening every file and examining the data in separate windows.

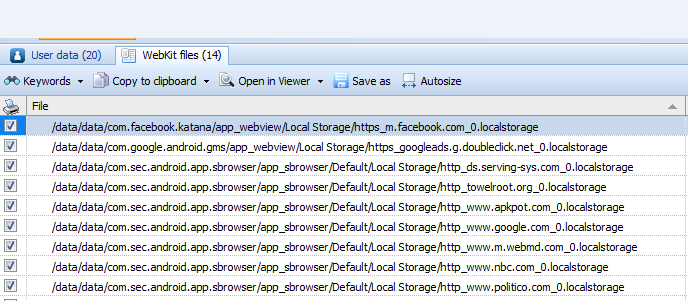
After exhasting my examination of the apps themselves, I went to the webkit and browser for more hunting. Below, I am using Oxygen to get an idea of the webkit files available from my data dump. I normally conduct a simple keyword search in my tool of choice for “localstorage”, but this way was much easier and eliminated the need for that step. As a side note, Oxygen did a great job parsing these files. I am simply showing the raw files associated with webkit activity.


Below I am showing an example of a localstorage file that I wanted to customize to fit my examination needs. I drafted a SQL query and joined two tables to show the results I needed for my forensic examination. This can be exported and included in my report template. The SQL Editor was used in this example.

The mapping was great in this tool, but I have decided to omit those screenshots, since it highlights my home location.  I found it interesting at how well the pesky locations (those located in log, xml and dat files) were parsed by Oxygen. If you have heard me present on location artifacts in tools, it is commonly a WARNING to tread carefully. The tools have a hard time interpreting how the location got onto the phone. A simple example: I receive an iMessage with an attached photo. I save the photo to my device. I dump my phone and look at the locations. The location from the shared photo shows up in my report as if my device was there. This is how someone without a lot of experience may interpret that evidence. Hence, be careful! The reality is that the the cool artifacts used and created by third-party apps use are often overlooked. I was thrilled that Oxygen parsed that location information, especially because Google Maps was throwing fits when I was attempting to manually render the lat/longs. Go Oxygen!

In summary, this was just a short blog post highlighting the successes I have been having with Oxygen. Additionally, customer support has been great. Is the tool perfect? No? Is it something you need in your forensic toolbox – Absolutely. If you end up taking FOR585, you will learn more about this tool. For those who aren’t looking for training and just want to test it on their own, see the details below and ask for a demo.

I hope these tools keep growing in capabilities and keep one another competitive to be the best. It helps us as examiners! Even though I use the tools to only get so far and rely on manual investigation techniques, getting over the first few hurdles is the hardest and then you set your pace. (Yes, I ran track… :)) I believe this tool will get you over those hurdles for application analysis.

To try Oxygen Detective and see the benefits for yourself, reach out to sales@oxygen-forensic.com and ask for a demo. Mention my blog!