June 25, 2018
I have been recently asked by students for a summary on how to handle smartphone acquisition of iOS and Android devices. I have avoided writing it down, like I would avoid the Plague, because mobile changes so quickly and I don’t want people to read something and live by it. I wrote this on my plane ride to Vancouver, so forgive any typos or briefness in this blog.
With that said, these methods are what work for me today. Others may prefer different methods, and that is great. If we were all the same, this would be a boring community, right?
This blog contains what I do on a normal basis when it’s possible. Anyone who conducts mobile device forensics knows that everything changes so quickly and what is possible today may require modification to work tomorrow. We adapt, adjust and are smarter because of it. 🙂
What I decided to do was to focus on Android and iPhone for this blog. Most of you have your favorite vendor tools and that is great. I recommend you use more than one because not one of them is perfect. Don’t become so reliant on one method that you avoid opportunities to test other tools and that you rely so much on a single tool that cannot extract data properly. I am avoiding listing tools specifically that I prefer because I have blogged on that in the past . I am simply defining steps I take that work and you can use the tool of choice to accomplish the following. Remember, it doesn’t have to cost the most to work the best! Sometimes the free methods give you the most data.
Android Acquisition Recommendations
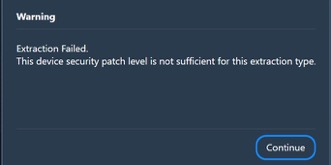
Android devices are becoming increasingly difficult to acquire. We have seen many devices now where basic information (photos, contacts and some calls) are retrieved. Sometimes only data that exists on the SIM is extracted. I am sure many of you have gotten the screen below and it’s disheartening! But we cannot stop trying.
This is not good enough for us to conduct our investigations. We need to get crafty! The first Android running OS 7 that I acquired shocked me. I was getting nothing from the tools! Below is an example of what I pulled – just a bunch of empty directories! Not good…![]()
It was a scary moment for me until I realized that good old ADB was my key to the most data. I will cut to the chase momentarily, but if you want more information on Android acquisition, I recommend you take vendor training if you rely on a tool and/or take FOR585 Advanced Smartphone Forensics, where we focus on analysis but recently updated the course to include the other options that may work when simple tool acquisition fails.
Things you will need:
- Install ADB on your forensic workstation (https://www.xda-developers.com/install-adb-windows-macos-linux/)
- Your forensic tools of choice
Android Acquisition Recommended Steps:
- ADB Backup (capture both the device (all) and SD (shared))
- adb backup –all
- adb backup – shared
- Logical Acquisition using a forensic tool – especially if ADB isn’t going well for you
- File System Acquisition if more than a backup is offered
- Physical Dump if you are aware and don’t care about the traces left behind (i.e. you don’t give the device back and you are not conducting covert operations)
- Make sure you acquire the SD card and SIM card if one is present (I like to remove these and acquire separately to ensure nothing is overlooked)
- Obtain Google credentials if possible
- Extract cloud data – IF YOU HAVE AUTHORITY!
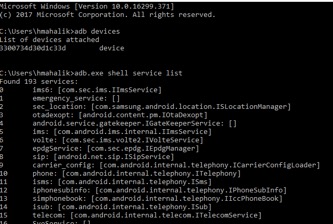
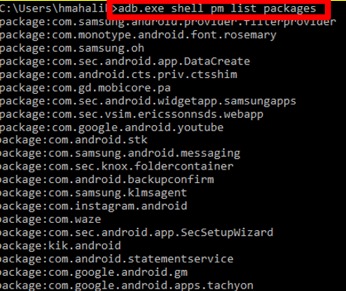
- I like to run some ADB commands to the device to ensure I extracted all information and that I am aware of what exists on the Android. Some examples are:
- adb shell service list
- adb shell pm list packages (shows apps that are installed)
- adb shell service list
- ALWAYS open the extraction to ensure you got what you hoped. If you have a physical dump, Autopsy is the fastest you will gain access to your data! And it’s free. (https://www.sleuthkit.org/autopsy/)
Android acquisition leaves traces behind on the device. If you conduct covert operations – tread carefully here. I put these steps in order with you in mind. Don’t go too far without knowing the footprint your tools and methods are leaving behind. These topics are covered more in the FOR585 class. (http://for585.com/course)
iOS Acquisition Recommendations
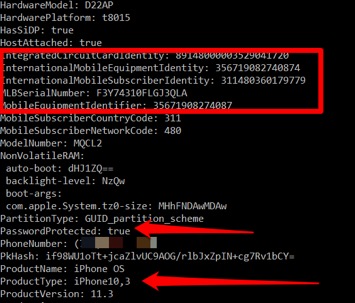
For iOS acquisition, it’s the same as it has been for years. Yes, there are rumors of the data port lockout. Yes, there are tools that crack into the device anyway. This blog is not focusing on that. It’s focusing on what you should try when you have an iOS device to investigate. You can choose to work on a Windows or Mac. I do both. Honestly, most of my acquisition takes place on my Windows forensic workstation, but I do have a Mac that I use to examine native files to Apple and for jailbreaking because Windows is sometimes flaky when it comes to that.
Things you will need:
- Install iTunes if you plan to create a backup
- Install iBackupBot (I prefer this tool over the other free ones because of the option to dump the crash logs) (http://www.icopybot.com/download.htm)
- Your forensic tools of choice
Recommended iOS Steps:
- Determine the iOS device type (chances are you will not obtain a physical dump because the device is most likely 64 bit and not jailbroken).
- Conduct a File System/Advanced Logical Extraction
- If using Cellebrite products, make sure you use Physical Analyzer and conduct both Method 1 and Method 2. I do not use UFED to dump iOS devices. Physical Analyzer is better.
- If you use Physical Analyzer and see Method 3 – congrats! You have come across a jailbroken device. 🙂
- If using another tool, use more than one to ensure you obtain all potential data from the device.
- If you want to be thorough, obtain a logical and/or backup file of the device. I typically stop at the file system dump since it contains the backup if I trust my tool (refer to my old blog or take FOR585 for more info on this topic)
- Connect the device to iBackup bot and dump the crash logs
- Ensure the tools you used did not enable iTunes encryption by connecting the device to iTunes and making sure “Encrypt Backup” is not selected.
6. Obtain iCloud and Google credentials if possible and extract cloud data – IF YOU HAVE AUTHORITY!
Also – do not guess passwords on the device and risk wiping it. Use a method that you have tested or a service that supports that device. If you are desperate and you are locked out, try the following:
For iOS:
- Attempt to communicate with (aka run command to) or pair to the device via libimobile
2. Attempt an iTunes backup
3. If you believe you can obtain iCloud credentials, pull the data from there – many tools support this
4. Try multiple cables
5. Only brute force on your own using a “hacker” box if you are willing to wipe the device.
For Android:
- Attempt to run ADB commands to the device. Try to collect as much information as possible.
- Remove and acquire the SD card in a write-protected manner, if one exists
- If not, attempt to acquire the emulated SD via FTK Imager or a similar tool as a USB Mass Storage Device
- Remove and acquire the SIM card
- Crack the lock if you can access the require files (*.key, etc.)
- Pull Google cloud artifacts, if possible – many tools support this
- Try multiple cables and modes (Recovery, Safe, Download, etc.) to see if your extraction is failing due to the device not being in the proper state
- If the device is unlocked – make sure you properly enabled all required developer mode settings
Again, we cover other methods and direct ways to interact with the device in FOR585 and I don’t want to, nor can I, give all of those juicy details away. This is simply a guide for things you should consider when faced with these devices. Obviously, we don’t all have time to run through all of these steps, but it’s nice to lay out what may work the best for you. If you want to learn more about smartphone forensics, sign up for FOR585 in DC next month. WARNING: The class is sold out so you can log in LIVE via Simulcast! This means you get to take the live course from anywhere and you get 6 days of action from 9-5 with me. You can ask questions via an online moderator and I will answer them LIVE! It’s not pre-recorded it is not OnDemand. It’s a pretty cool setup and I think you will like it. Check it out for585.com/online.