Determining when an iOS backup was created

One point of contention in the FOR585 Advanced Smartphone Forensic class is – which files store the correct datetime for when a user created an iOS backup?  I’ve engaged in a few friendly arguments over this topic and it recently popped up again when Lee was teaching in NYC in August. Every time this question comes up, I test it again. I have probably tested this more times than I should have, which is why I am finally putting it in writing.

So, when you are asked – “When did a user last create an iTunes or iCloud backup?” – You can answer with confidence next time.

The first thing to consider is what you are examining. Are you looking at a backup file extracted from a PC or Mac? Are you looking at an iCloud backup? Are you looking at a file system dump created by a commercial or free tool? If you are looking at a backup (iTunes or iCloud) this process is a lot easier. If you are looking at a file system dump created by a tool, this is where the confusion may set in. I hope this blog makes your examination easier by breaking down what is happening for each file. For this test, I used my own iPhone that I use every day. Why? Because I know when I backup and I can then verify dates.

The files we are going to examine for backup datetime activity include:

  • info.plist
  • status.plist
  • manifest.plist
  • device_values.plist

All of these files are important, but the dates inside of each may vary and a smartphone tool may update the date inside of the file. If you are looking at a backup that was extracted from a PC or a Mac, the status.plist will contain the start date and time for an iTunes backup.  The info.plist also stores a datetime and whether the backup was successful (snapshot state), but it is not the start date. It is often the completion datetime and doesn’t state if the backup was successful, which is why I rely on the status.plist, when the file is available. The manifest.plist is more helpful when it comes to dealing with locked backup files that need to be cracked. The date in the manifest.plist is often the same as the date in the info.plist and again this file does not track if the backup was successful or not.

Now here is the tricky part. If you completed a file system dump of an iOS device, the following files will most likely show a date that is NOT when the user created a backup. This date will be when you created the forensic image. This makes people uncomfortable, but it makes sense if you think about it. iTunes (or a process like iTunes) is most likely being used in the background to create the forensic image. It makes sense that these datetimes would be trampled. In this case, I rely on device_values.plist which remains untouched by any tool or method you use to create a forensic image of an iOS device.

At this point I have either confused you or validated what you already know. Either way, let’s take a look at my test.

I dumped my iPhone using Cellebrite Physical Analyzer Method 1. I only did Method 1 because I wanted to make sure that it pulled the device_values.plist and I was doing this test during a lab and didn’t have much time. NOTE: I have noticed in the past that this file may only be pulled using Method 2, so use both just in case. If you are wondering why I recommend both of these extraction methods refer to my previous blog posts. I completed this extraction on August 18, 2018 around 14:20 (I had a few connection issues and had to troubleshoot which is why I state “around”). I did not backup my device at this time other than using my tool to create a file system dump (aka – I did not launch iTunes and create a backup).

The info.plist is shown below. Notice the timestamp matches the extraction completion time and NOT the time the device was backed up by the user? If you used a commercial tool to acquire the device, simply look at the Extraction details to compare extraction time.

Next, I looked at status.plist. Again the date is NOT when the user backed up the device. This is when the extraction completed in Physical Analyzer.

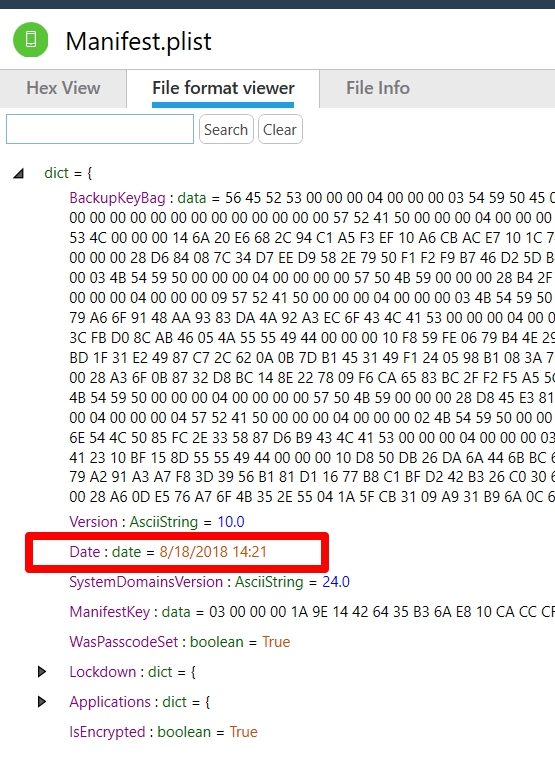
Finally, we look at the manifest.plist. And we see the same date, but a time that occurs before the times in info.plist and status.plist.

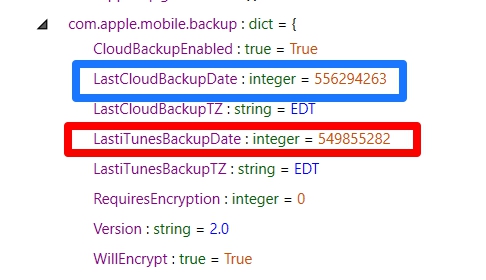
I believe this is when Cellebrite scans the phone to determine if the tool should present you with the check box to encrypt the backup, or not, if the device is already encrypted. This is also around the time I started the extraction.  So, this is really just showing you how long the Method 1 extraction took and has absolutely nothing to do with when the user last created a backup. Now we look at the device_values.plist and we get the correct answers.

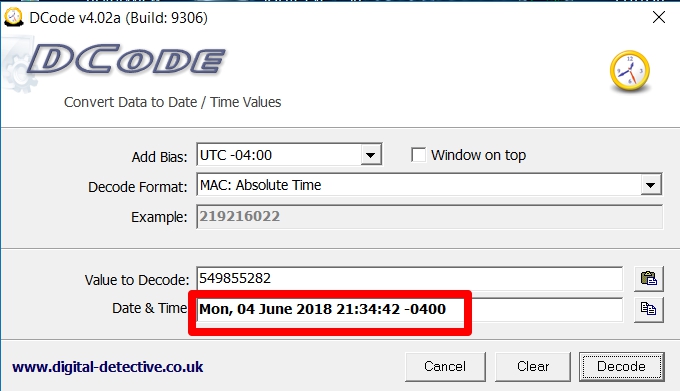
Not only do we get to see datetimes for iTunes backups, but also iCloud, if the user has ever backed up to cloud under com.apple.mobile.backup. We simply have to decode our datetime stamp for the LastiTunesBackupDate and we get June 4, 2018 at 21:32:42 Eastern Time. (Note: I normally keep it at UTC, but I know when I created my last backup in local time and wanted to compare).

So, in short the forensic extraction methods will update the datetime in status.plist, info.plist and manifest.plist during the acquisition process. If you are conducting analysis of an iOS device image (not a backup) you should rely on the datetime recovered from device_values.plist. If you are dealing with a traditional backup file, use the status.plist for the datetime on when the last successful backup was created.


Forensic Grunt Work

Looking to blog and don’t know where to post it? I am happy to host your thoughts for you. Below is the first guest blog post by a past FOR585 student. If you have something to write about, please let me know. 

by Terrence D. Williams

I have revisited this same post in my mind nearly fifteen times a day. It finally hit me. It hit me a little harder than I expected but the topic was pretty apparent to me. Until I was driving down the road to work, I didn’t understand the purpose of many of the tasks I completed in my early years in the Marine Corps. When I first entered the Corps, I had a lot of functions that seemed purposeless. All these actions are something that I call “grunt work.” Grunt work can be categorized as all the long, tedious days of doing tasks that seem meaningless, but in the future, they become muscle memory.

Forensic grunt work hurt me because I did not understand why I needed to stare at a computer screen day in and day out, learning about various computer technologies. It dawned on me when I was driving down the street how I should have put in the work in the early days of my forensic career. I wanted to build a Python XML parser that could convert the output from one of the live forensic tools utilized by my team. My problem was that I did not know a lick about XML. I mean, I did not know about the root, the children, nor the elements. These are basic terms that are present in the popular XML language. I couldn’t fathom how my biggest problem in the situation is that I didn’t know the basics of XML.

Forensic grunt work helped me because the Marine Corps inadvertently taught me how to develop skills that become muscle memory. Over the course of two weeks, I read possibly twenty different articles about the structure of XML. Once I knew the basics, I began to combine my Python knowledge with my new XML knowledge. I was spending about 4 hours a day playing in Python’s interactive mode trying to see the many ways that I could build the original program that I set out to create back in July. With the help of Stack Overflow and the SEC573 SANS course, I was able to build the program that allowed me to parse the XML output from the tool to make my team more efficient.

How does Forensic Grunt Work work? It is a somewhat simple process. If we only limit the forensics world to Windows Operations Systems, Smartphones, and Network Security Monitoring you are still looking at more than a year’s worth of reading material. If you are a Mike Ross (a USA Suits reference), then this will be an easy task for you. You will be able to read each book and article one time and remember every single detail that you previously read. Unfortunately, you are most likely like me. You will read it once or twice, then use it as a reference book for the future because everything didn’t stick. This is where forensic grunt work comes into play.

2018 is the probably one of the greatest times to learn forensic skills. After reading “The Importance of Deep Work & The 30-Hour Method for Leaning A New Skill” by Azeria, I have developed my process of using Grunt Work to my advantage:

  1. The Prep Work
  2. Pick a skill that I need currently or will need in the future
  3. Open the calendar app in my iPhone, to make me a study schedule of 30 hours. Monday – Friday: 4 hours, Saturday – Sunday: 5 hours
  4. I am a tech junkie, so the best way to establish my schedule is to use technology. When a calendar alert is scheduled, my phone tells me, my watch tells me, my home system tells me, it pops up in my car, and it lets the people I share with that I have something scheduled
  5. I break my daily sessions into 2-hour sessions. One session in the morning and one session at night
  6. I know myself, so 4 hours is not the starting point for me.
  7. During my sessions, I turn off the TV and place my phone on Do Not Disturb
  8. The Grunt Work
  9. Gather the books and articles related to the subject
  10. First 10 hours of the work will be reading and note taking
  11. Build a lab environment
  12. The lab environment is a simple setup that typically involves one or two virtual machines
  13. I tend to use open source tools that are easy to obtainable to not detract from my work

iii. Lab build is 2 hours

  1. Goal setting
  2. I write down the goal from the prep work stage in multiple locations.
  3. The goal is to be able to see it to allow me to stay on task
  4. The Grunt Work
  5. The last 18 hours of my process is dedicated to the skill development
  6. I begin in the lab environment by exploring the environment in relation to the goal

1) If the goal is to understand XML, I open the document in a text editor to see the format. I open the same document with the various tools to see how the tool will present it. Then compare the tools to the text editor.

iii. I begin to replicate the examples I found in the books and articles.

1) If the goal is to build the XML parser, I copy the examples in the books and articles. I slowly transform the examples to fit the current XML file I want to analyze

  1. I now assign some challenges for myself that I think will help me get to the end goal

1) What if I don’t want all the XML file, how do I alter it?

2) What if I want to have pieces of the file that I will want consistently, how can I loop through it?

  1. Finally, I apply the goal to challenges that others have had with similar goals

1) Go through stack overflow to see the questions that are similar to my goal

2) Can I answer their questions in my lab?

  1. a) If not, revisit the examples and challenge steps above.
  2. Post Work
  3. Save the books, articles, and notes for later reference
  4. Clean the material into an easily searchable format for me

For me, the above process is excellent. For someone else, the process will not be what he or she needs. The goal is not to repeat my process verbatim, but to make you’re 30-hour process in the same way. The process is a condensed Grunt Work model that will be an introduction to a new skill. The overall grunt work process will transform you into a master of the skill the more and more you apply the skill over your career. Challenge yourself to push past your comfort point in learning. To push myself, I will eventually work up to the point where my 30 hours are broken up into 4-hour sessions. Make it work for you. Good luck in beginning the skill learning process of grunt work.